eManifest Portal
eManifest Portal User Guide
This document is also available in PDF (8.1 Mb) [help with PDF files]
Revision History
| Date | Version | Changes made | Changes made by |
|---|---|---|---|
| September 2012 | 1.0 | Published to the CBSA website | CBSA - Business Transformation and Integration Team |
| October 2012 | 1.1 | Updates made to the eManifest Portal Overview chart, sections 2.1; 2.2.1; 2.2.2; 2.2.3; 2.3, 2.4; 2.5.1 and figure 2-1 | CBSA - The Portal Team |
| June 2013 | 2.0 | Updates made to the eManifest Portal Overview chart, sections 1.0; 1.1; 1.2; 1.3; 1.4; 1.5;1.6; 2.1; 2.2; 2.2.1; 2.2.2; 2.2.3; 2.4; 2.5; 2.5.1; 2.5.2; 2.5.3; 2.5.4; 3.1; 4.1; 4.2; 5.1; 5.2; 5.3; 5.4; 6.0; 6.1; 6.2; 6.3; 6.3.1; 6.3.2; 6.3.3; 6.3.4; 6.4; 6.4.1; 6.4.2; 6.5; 6.5.1; 6.5.2; 6.5.2.1; 6.5.2.2; 6.5.3; 6.5.4; 6.6; 6.7; 6.8; 6.8.1; 6.8.2; 6.9; 6.10; 7.0; 7.1; 7.2; 7.2.1; 7.2.2; 7.2.3; 7.3; 7.3.1; 7.3.2; 7.3.3; 7.3.4; 7.4; 7.5; 8.0; 8.1; 8.2; 9.0; 9.1; 9.2; 9.3; 10.0; 10.1; 10.1.1; 10.1.2; 10.2; 10.3 and to all the figures. | CBSA - The Portal Team |
| February 2017 | 2.1 | Updates made to the sections 1.3, 1.5, 2.5.3, 2.5.4, 6.2, 6.4.2, 6.5.1, 6.5.2, 6.5.2.1, 6.5.3, 6.5.4, 6.7, 6.9, 6.9.1, 6.9.2 | CBSA - The Portal Team |
| January 2025 | 2.2 | Updates made to section 6.5.1: - Updated the Status entry for “Deconsolidated” | CBSA – Commercial Project Delivery Division |
Table of Contents
- 1.0 Introduction
- 2.0 Getting started
- 3.0 Using the Portal
- 4.0 System Messages
- 5.0 Useful Links
- 6.0 Trade Documents
- 6.1 Types of Trade Documents created in the Portal
- 6.2 Navigating the Trade Documents tab
- 6.3 Creating a Trade Document - Highway Carriers
- 6.4 Draft Documents tab
- 6.5 Submitted Documents tab
- 6.6 Editing a Submitted Document
- 6.7 Cancelling a Submitted Document
- 6.8 Printing/Downloading
- 6.9 Secondary Notices
- 7.0 Lookups
- 8.0 Updating Profile Information
- 9.0 Managing User Accounts
- 10.0 Managing Business Accounts
Table of Figures
- Figure 2-1 Getting set up in the Portal
- Figure 2-2 eManifest Portal Terms and Conditions page
- Figure 2-3 eManifest Portal (Create User Account) page
- Figure 2-4 Create User Account page
- Figure 2-5 User Account Created
- Figure 2-6 User Account creation confirmation e-mail
- Figure 2-7 eManifest Portal - Welcome page
- Figure 2-8 Business Accounts - Create Business Account
- Figure 2-9 Create Business Account - Step 1 of 3
- Figure 2-10 Create Business Account - Step 2 of 3
- Figure 2-11 Create Business Account - Step 3 of 3
- Figure 2-12 Business Account Created page
- Figure 2-13 Business Accounts page
- Figure 2-14 Business Account confirmation e-mail
- Figure 2-15 Business Account tab
- Figure 2-16 User Access tab
- Figure 2-17 User Access tab - Add User page
- Figure 2-18 User Access tab - Add User - Step 1 of 2
- Figure 2-19 User Access tab - Add User - Step 2 of 2
- Figure 3-1 Messages tab - System Messages and Useful Links
- Figure 4-1 Messages tab - System Messages List
- Figure 4-2 Messages tab - System Message
- Figure 5-1 Messages tab - Useful Links section
- Figure 5-2 Messages tab - Useful Links and new browser window
- Figure 5-3 Messages tab - Useful Links section (Create Useful Link)
- Figure 5-4 Messages tab - Create Useful Link page
- Figure 5-5 Messages tab - Modify Useful Links
- Figure 5-6 Messages tab - Modify Useful Link page
- Figure 5-7 Messages tab - Edit Useful Links page
- Figure 5-8 Messages tab - Delete Useful Link
- Figure 6-1 Trade Documents tab
- Figure 6-2 Trade Documents tab - Create Combined Highway Document
- Figure 6-3 Trade Documents tab - Create Trade Document
- Figure 6-4 Trade Documents tab - Create Trade Document (Combined Highway Document)
- Figure 6-5 Trade Documents tab - Create Combined Highway Document (Cargo tab)
- Figure 6-6 Trade Documents tab - Submitted to the CBSA (Combined Highway Document)
- Figure 6-7 Trade Documents tab - Create Trade Document (Highway Cargo Document)
- Figure 6-8 Trade Documents tab - Create Highway Cargo Document (Cargo tab)
- Figure 6-9 Trade Documents tab - Submit to the CBSA (Highway Cargo Document)
- Figure 6-10 Trade Documents tab - Create Trade Document (Highway Conveyance Document)
- Figure 6-11 Trade Documents tab - Create Highway Conveyance Document
- Figure 6-12 Trade Documents tab - Enter Trailer Information
- Figure 6-13 Trade Documents tab - Enter Trailer Information #01
- Figure 6-14 Trade Documents tab - Select a CCN(s)
- Figure 6-15 Trade Documents tab - Highway Conveyance Document (Trailer tab)
- Figure 6-16 Trade Documents tab - Highway Conveyance Document (Submit to the CBSA)
- Figure 6-17 Trade Documents tab - Draft Documents tab (Column Headings)
- Figure 6-18 Trade Documents tab - Draft Documents tab
- Figure 6-19 Trade Documents tab - Combined Highway Document
- Figure 6-20 Trade Documents tab - Draft Document - Customized List/Tab
- Figure 6-21 Trade Documents tab - Draft Document - Save Customization
- Figure 6-22 Trade Documents tab - Submitted Documents tab (Highway Conveyance Documents)
- Figure 6-23 Trade Documents tab - Submitted Documents tab (Highway Cargo Documents)
- Figure 6-24 Trade Documents tab - Status History (Highway Conveyance Document)
- Figure 6-25 Trade Documents tab - Submitted Highway Conveyance Document (Status)
- Figure 6-26 Section 12(1) Report
- Figure 6-27 Trade Documents tab - Search Submitted Trade Documents
- Figure 6-28 Trade Documents tab - Submitted Trade Documents Search Results
- Figure 6-29 Trade Documents tab - Customize List View
- Figure 6-30 Trade Documents tab - Submitted Highway Conveyance Document (Edit Document)
- Figure 6-31 Trade Documents tab - Edit Submitted Highway Conveyance Document
- Figure 6-32 Trade Documents tab - Edit Submitted Highway Conveyance Document (Select Reason for the Amendment)
- Figure 6-33 Trade Documents tab - Resubmitted to the CBSA
- Figure 6-34 Trade Documents tab - Submitted Highway Conveyance Document (Cancel Submission)
- Figure 6-35 Trade Documents tab - Cancel Submission
- Figure 6-36 Trade Documents tab - Submitted Documents tab
- Figure 6-37 Trade Documents tab - Submitted Highway Conveyance Document
- Figure 6-38 File Download
- Figure 6-39 Highway Conveyance Document - Page 1
- Figure 6-40 Highway Conveyance Document - Page 2
- Figure 6-41 Highway Conveyance Document - Page 3
- Figure 6-42 eManifest Portal Lead Sheet
- Figure 6-43 Trade Documents tab – Secondary Notices tab
- Figure 6-44 Trade Documents tab – Search Secondary Notices
- Figure 6-45 Trade Documents tab – Search Secondary Notices Search Results – Manifest Forward
- Figure 6-46 Trade Documents tab – Search Secondary Notices Search Results – Document Not on File notice
- Figure 6-47 Secondary Notices Tab
- Figure 6-48 Trade Document tab – Customize Secondary Notices
- Figure 6-49 Trade Document tab – Secondary Notices
- Figure 6-50 Trade Document tab – Delete Secondary Notice
- Figure 7-1 Lookups tab
- Figure 7-2 Lookups tab - Trailer tab (Create Trailer Lookup)
- Figure 7-3 Lookups tab - Create Trailer Lookup
- Figure 7-4 Trade Documents tab - Addresses tab (Shipper section, Create a Shipper Lookup)
- Figure 7-5 Trade Documents tab - Create a Lookup from a submitted Trade Document
- Figure 7-6 Lookups tab - Search Consignee Lookups
- Figure 7-7 Lookups tab - Consignee Lookup Search Results
- Figure 7-8 Trade Documents tab - Create Combined Highway Document (Select Shipper Lookup)
- Figure 7-9 Trade Documents tab - Shipper Lookup Search Results
- Figure 7-10 Trade Documents tab - Shipper Information Populated by Selected Lookup
- Figure 7-11 Use Trade Documents Lookup
- Figure 7-12 Select Trade Documents Lookup
- Figure 7-13 Use Trade Documents Lookup
- Figure 7-14 Lookups tab - Tractor sub-tab
- Figure 7-15 Lookups tab - Tractor Lookup Details
- Figure 7-16 Lookups tab - Edit Tractor Lookup
- Figure 7-17 Lookups tab - Tractor Lookup Details
- Figure 7-18 Lookups tab - Delete Tractor Lookup
- Figure 8-1 Updating Profile Information
- Figure 8-2 My Profile - Edit
- Figure 8-3 Edit My Profile - Edit Profile Information
- Figure 8-4 Edit My Profile - Delete User Account
- Figure 9-1 User Access tab - User Access (Account Users)
- Figure 9-2 User Access tab - User Details (Edit)
- Figure 9-3 User Access tab - Edit User Role
- Figure 9-4 User Access tab - User Details (Modify)
- Figure 9-5 User Access tab - Edit User Role and Status (Suspend)
- Figure 9-6 User Access tab - Suspend User (User Role Suspended)
- Figure 9-7 User Access tab - User Details (Remove)
- Figure 9-8 User Access tab - User Details (Remove User)
- Figure 9-9 User Access tab - User Access (Account User Removed)
- Figure 10-1 Business Accounts - Updating Business Account Information
- Figure 10-2 Business Accounts - Account Owner Information tab
- Figure 10-3 Business Accounts - Editing Account Owner Information
- Figure 10-4 Business Accounts - Request Business Account Update
- Figure 10-5 Business Accounts - Request Business Account Update
- Figure 10-6 Business Accounts - Default log in Business Account
- Figure 10-7 Business Accounts - Modifying a business account
- Figure 10-8 Business Accounts - Deleting a business account
- Figure 10-9 Business Accounts - Delete Business Account confirmation message
eManifest Portal Overview

1.0 Introduction
The eManifest Portal User Guide provides users of the Canada Border Services Agency's (CBSA) eManifest Portal with instructions for completing tasks in the eManifest Portal. This version of the Guide supports clients that will be transmitting their pre-arrival data electronically to the CBSA using the eManifest Portal. The term "Portal" is used as a short-form reference to the eManifest Portal.
The eManifest Portal is a secure data transmission option developed by the CBSA that allows the trade community to electronically transmit their pre-arrival data through the Internet.
For more information on eManifest and business requirements, including exemptions and exceptions, refer to the eManifest section of the CBSA Web site.
1.1 What is in this Guide?
This Guide is a reference tool for using the eManifest Portal. It includes step-by-step instructions for using key features of the Portal such as:
- navigating in the Portal;
- creating and managing User and Business Accounts;
- creating and managing Trade Documents;
- viewing and printing status information for Trade Documents; and
- creating and printing Lead Sheets to present at the border.
This Guide is not all-inclusive and should be used in conjunction with audience-specific documentation:
- Highway carriers should refer to the: Electronic Commerce Client Requirements Document (ECCRD) - Chapter 7: Advance Commercial Information (ACI)/eManifest Highway Portal.
- Freight forwarders should refer to the: Electronic Commerce Client Requirements Document (ECCRD) – Chapter 8: Advance Commercial Information (ACI)/eManifest Portal - House Bills.
You will also need to read and understand the eManifest business rules and processes and the requirements for your business type whether you are a highway carrier, freight forwarder, broker or warehouse operator. Refer to the client support page of the CBSA Web site for additional help documentation.
1.2 Technical requirements
To access the Portal, you must have an Internet connection and one of the following Web browsers:
- Internet Explorer 8 and higher;
- Firefox 34 and above (recommended).
For more information about the technical requirements for using the Portal, highway carriers may refer to the ECCRD - Chapter 7: Advance Commercial Information (ACI)/eManifest Highway Portal and freight forwarders may refer to the Electronic Commerce Client Requirements Document (ECCRD) – Chapter 8: Advance Commercial Information (ACI)/eManifest Portal - House Bills in the eManifest section of the CBSA Web site.
In order to use the eManifest Portal, each user is now required to ensure that JavaScript is enabled on their computer. This requirement comes as a result of the new eManifest Portal features which require JavaScript.
To avoid unexpected errors while logged in to the eManifest Portal do not use your Web browser's Back button. Use the navigation features provided within the Portal.
The Portal will log you out after 20 minutes of inactivity. To continue using the Portal, you will be required to log in again. To ensure no loss of information, you are strongly encouraged to save your work often.
1.3 Client support
The CBSA has established client support units to assist trade chain partners with the implementation of and compliance with eManifest. These units can be contacted by e-mail and/or telephone.
- The Border Information Service (BIS) is a telephone service that provides general information on most CBSA programs, including eManifest.
- The eManifest Helpdesk provides support by e-mail on eManifest policy and operational-related inquiries.
- The Technical Commercial Client Unit (TCCU) provides Electronic Data Interchange (EDI) and Portal technical support by e-mail and telephone for air, marine, highway and rail carriers, freight forwarders, importers, brokers and service providers.
Complete contact information is available in the eManifest section of the CBSA Web site.
1.4 Features used in this Guide
The legend below shows the features used in this Guide.
| Feature | Description |
|---|---|
sample |
Important information or tip for the user. |
| Bold text | Within a list of task steps, this indicates a reference to an interactive object in the Portal, such as a command, and the names of data entry fields. |
| Italic text | Used to highlight the names of figures (e.g. screen images and other diagrams) as well as the titles of legislation such as the Customs Act. |
1.5 Symbols used in the Portal
The following symbols are used throughout the Portal.
| Icon | Description |
|---|---|
| This symbol indicates there is help available online. Select the icon to view the content of the field level help. | |
| This symbol indicates there is help available online. Select the icon to view help content of the screen level help. | |
| This symbol indicates that when you select the link, the information will be displayed in a new browser window. | |
This may be displayed next to a Status. The
|
1.6 Other reference information
For additional information on eManifest and the CBSA's advance reporting requirements for businesses, refer to the following:
- eManifest section of the CBSA Web site
For information on eManifest as well as links to related information. - eManifest Portal Help and Support page of the CBSA Web site
For information on the eManifest Portal as well as links to related information.
For information on the requirements for electronic data transmission using the Portal refer to the Electronic Commerce Client Requirements Document (ECCRD).
- ECCRD - Chapter 7: Advance Commercial Information (ACI)/eManifest Highway Portal (for highway carriers).
- Electronic Commerce Client Requirements Document (ECCRD) – Chapter 8: Advance Commercial Information (ACI)/eManifest Portal - House Bills (for freight forwarders).
2.0 Getting started
2.1 Getting set up in the Portal
The following diagram provides an overview of the steps that both individuals and businesses must take to access the Portal. This multi-step process was developed by the CBSA to ensure the security and integrity of data in the Portal, in accordance with Government of Canada requirements.
Figure 2-1 Getting set up in the Portal
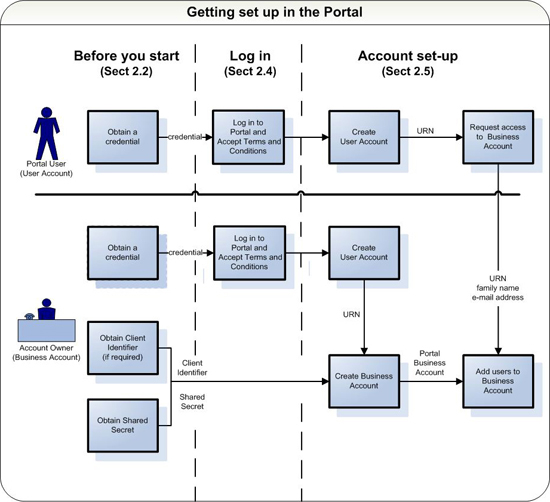
There are two types of accounts in the Portal - the User Account and the Business Account. All Portal users must first obtain a credential and then create a Portal User Account. Only the authorized representative of your company, known as the Account Owner, can create a Portal Business Account.
Once both the User Account and Business Account have been established, the Account Owner or Proxy Account Owner can add users to the Business Account and assign each user a role and a status. For a list of the tasks that each user role can perform in the Portal, see section 2.5.3 of this Guide.
2.2 Before Starting
The following chart summarizes what you need to do before you can create a Portal account.
| Account Type | User | What You Need | ||
|---|---|---|---|---|
| Credential | Client Identifier | Shared Secret | ||
| User Account | All users | Required | ||
| Business Account | Account Owner | Required | Required | Required |
2.2.1 Credentials
In order to create an eManifest Portal User Account, all users must first obtain a credential that protects their communications with online government programs and services. There are two credential options: a commercial credential service (Sign-In Partner) and a government-issued credential service (GCKey). If you wish to find out more information about each credential option available please refer to the Cyber Authentication Renewal Initiative Frequently Asked Questions or the eManifest Portal - Frequently Asked Questions (FAQs) addressed to your company type.
To obtain a credential, see section 2.3 of this Guide.
Before you start: You will need a valid e-mail address.
2.2.2 Client Identifier
If you are the authorized representative of your business, you must ensure that your business has a valid Client Identifier.
For additional information about client identifiers, please refer to the eManifest section of the CBSA Web site.
2.2.3 Shared Secret
A Shared Secret is a temporary access code that a business requires to create a Portal Business Account in the eManifest Portal. The CBSA issues it to businesses that request access to the Portal and must be used within 90 days of the issue date. The Shared Secret is used to authenticate and validate a client when creating an eManifest Portal Business Account. Only the CBSA and the authorized representative of the company have access to this information. For additional information, refer to the eManifest section of the CBSA Web site.
New companies
For new companies that must apply for both a client identifier and a Shared Secret, the application form includes a section that allows you to request both. For additional information, refer to the Shared Secret page on the CBSA Web site.
Existing companies
If you currently have a valid client identifier, you will not be required to re-apply using the client identifier application form to obtain your Shared Secret. Existing companies can apply for a Shared Secret by submitting a signed letter request to the CBSA on company letterhead. The letter must be signed by an authorized representative (someone with signing authority) who must be a company contact identified in the CBSA's client identifier records. For additional information, refer to the eManifest section of the CBSA Web site.
2.3 Obtaining a credential
As outlined in section 2.2, all users of the eManifest Portal are required to obtain a credential before they can access the Portal. A credential, in the information systems context, is an attestation of identity authentication that protects your communications with online government programs and services. The two credential options currently available are Sign-In Partner and GCKey.
For specific information on logging in to the eManifest Portal with either Sign-In Partner or GCKey, or to transfer credentials, please refer to the eManifest Portal - Quick Reference Guide (QRG).
2.4 Logging in to the Portal
This section outlines the steps to log in to the Portal.
Start at: eManifest Portal Log In.
- Select the credential option with which you would like to log in, either Sign-In Partner or GCKey.
- Enter your credential information.
- Review the eManifest Portal Terms and Conditions of Use (see Figure 2-2).
- Select I Accept. You can now create your User Account. See section 2.5.1 of this Guide.
Figure 2-2 eManifest Portal Terms and Conditions page
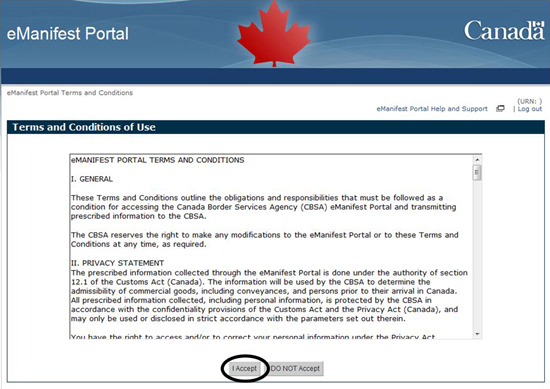
Every time you log in to the Portal, you must accept the eManifest Portal Terms and Conditions to be able to continue.
If you select I DO NOT Accept the eManifest Portal Terms and Conditions, you cannot continue and you will be asked if you want to log out.
2.5 Account set up
As shown in Figure 2-1, there are two types of Portal accounts that must be set up before you can enter data in Trade Documents:
| User Account | A Portal User Account is a standard way for all users to establish their identity in the Portal. All users of the Portal must create an eManifest Portal User Account. A Business Account Owner can then associate your User Account to their Business Account and assign user roles and statuses. |
|---|---|
| Business Account | A Portal Business Account is an area in the eManifest Portal dedicated to individual companies to conduct secure data transmissions with the CBSA. Portal Business Accounts are managed by Account Owners who are authorized representatives of a company. |
2.5.1 Setting up a User Account
This section outlines the steps for creating a Portal User Account.
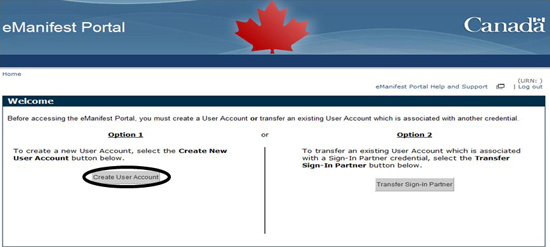
The first time you log in to the Portal with your credential, and accept the Terms and Conditions, the eManifest Portal Welcome (Create User Account) page will be displayed(see Figure 2-3).
Start at: eManifest Portal - Welcome (Create User Account) page.
This page is displayed only when creating a User Account.
- Select Create User Account (see Figure 2-3).
Figure 2-3 eManifest Portal (Create User Account) page
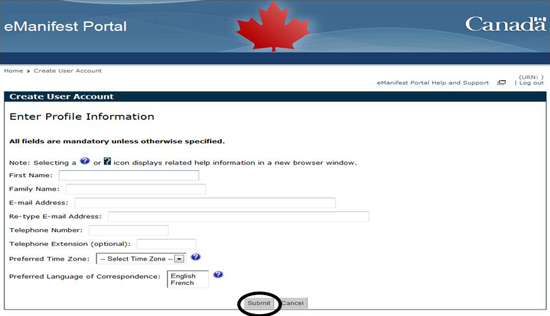
- Enter your profile information. All fields are mandatory unless otherwise indicated on the screen.
- Select Submit (see Figure 2-4).
Figure 2-4 Create User Account page
- Select Continue (see Figure 2-5).
Figure 2-5 User Account Created
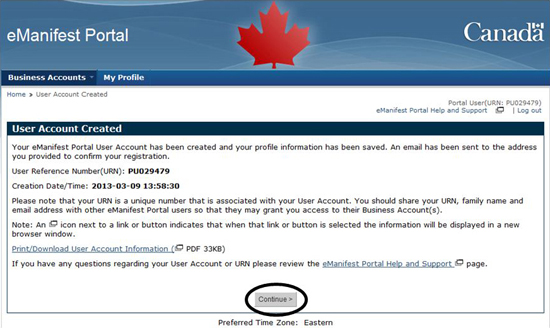
Once you have created a Portal User Account you will be provided with a User Reference Number (URN). A URN is a system-generated number uniquely associated with a Portal User Account.
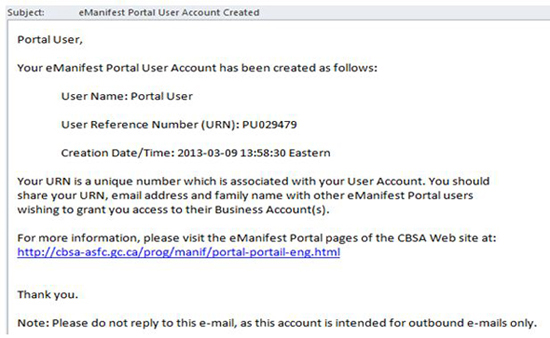
An e-mail confirming that your User Account has been created will be sent to the e-mail address you provided when creating your User Account. The e-mail will contain the same information displayed on the User Account Created - Profile Information Saved page (see Figure 2-5).
The User Account information in the e-mail should be saved for future reference (see Figure 2-6).
If you are the authorized representative for your company, you may create a Business Account and register yourself as the Account Owner. If you are not the authorized representative, you must provide your URN, e-mail address and family name to the person who is the Account Owner so they can add you as a user to your company's Business Account.
Figure 2-6 User Account creation confirmation e-mail
2.5.2 Creating a Business Account
This section outlines the steps for creating a Business Account in the Portal.
Before you start, you will need:
- Client identifier (CBSA-issued);
- CBSA-issued Shared Secret; and
- Portal User Account.
If you are the authorized representative of your company, you may create your company's Business Account in the Portal. By creating your Business Account, you become the Account Owner. There is only one Account Owner for each Business Account. You may set up more than one Business Account if you represent more than one business. Each Business Account must have a unique client identifier and Shared Secret.
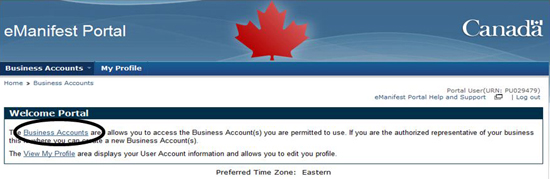
Start at: eManifest Portal - Welcome page (see Figure 2-7).
- Select Business Accounts (see Figure 2-7).
Figure 2-7 eManifest Portal - Welcome page
- Select Create Business Account (see Figure 2-8).
Figure 2-8 Business Accounts - Create Business Account

- Enter your Client Identifier (e.g. carrier code), Business Type (e.g. carrier) and Shared Secret.
- Select Submit (see Figure 2-9).
Figure 2-9 Create Business Account - Step 1 of 3

- Enter all mandatory Account Owner Information. Optional fields are indicated on the page.
- Select Submit (see Figure 2-10).
Figure 2-10 Create Business Account - Step 2 of 3

- Review the business information displayed (see Figure 2-11).
- Select Continue (see Figure 2-11).
Figure 2-11 Create Business Account - Step 3 of 3

If the business information displayed is incorrect, select Request Update and refer to section 8.0 of this Guide for instructions on updating profile information.
- Select OK (see Figure 2-12).
Figure 2-12 Business Account Created page

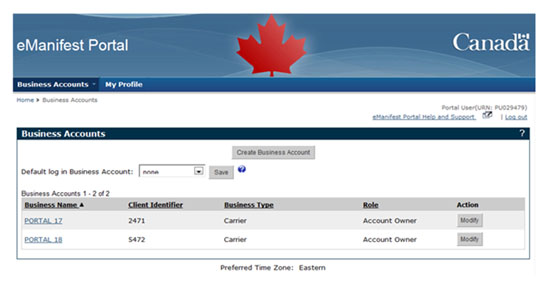
- The Business Accounts page is displayed with your Business Account name listed as well as your Client Identifier, Business Type and Role (see Figure 2-13).
Figure 2-13 Business Accounts page
An e-mail will be sent to the Account Owner's e-mail address confirming that the Business Account was successfully created (see Figure 2-14).
The Business Account information in the e-mail should be saved for future reference.
Figure 2-14 Business Account confirmation e-mail

2.5.3 Adding users to the Business Account
As an Account Owner you are responsible for adding users to your Business Account and assigning user roles and statuses. These user roles and statuses define what the user can do in your Business Account.
The Account Owner has the option to delegate the responsibility of setting up and managing user access by assigning the Proxy Account Owner role to one or more users within the Business Account.
User roles in the Portal:
| Account Owner | An Account Owner is a user role in the Portal that has the unique ability to register and update the Business Account. The Account Owner has different access privileges depending on their business type. They are defined as follows: Highway carriers and freight forwarders can view, create and edit Trade Documents, Lookups and Useful Links; grant access and assign user roles to other users in the Portal; and view System Messages, Secondary Notices (Manifest Forwards, Document Not on File notices) , Lookups and Useful Links in its associated Business Account Brokers and warehouse operators can view System Messages, Secondary Notices (Manifest Forwards) , Lookups and Useful Links in its associated Business Account. |
|---|---|
| Proxy Account Owner | The Proxy Account Owner is a user granted privileges by an Account Owner. Highway carrier and freight forwarder Proxy Account Owners are granted the ability to view, create and edit Trade Documents, Lookups and Useful Links; grant access and assign user roles to Portal Users; and view System Messages, Secondary Notices (Manifest Forwards, Document Not on File notices), Lookups and Useful Links in the associated Business Account. Brokers and warehouse operators can view System Messages, Secondary Notices (Manifest Forwards), and Useful Links in its associated Business Account. |
| Account User | The Account User is a user granted privileges by an Account Owner or a Proxy Account Owner. Highway carrier and freight forwarder Account Users are granted the ability to view, create and edit Trade Documents, Lookups, Useful Links and view System Messages, Secondary Notices (Manifest Forwards, Document Not on File notices), Lookups and Useful Links in the associated Business Account. Brokers and warehouse operators can view System Messages, Secondary Notices (Manifest Forwards), and Useful Links in its associated Business Account. |
| Account Browser | The Account Browser is a user granted read-only access privilege by an Account Owner or Proxy Account Owner in the associated Business Account. Highway carrier and freight forwarder Account Browsers are granted the ability to view Trade Documents, Lookups, Useful Links, System Messages, Secondary Notices (Manifest Forwards, Document Not on File notices), and Useful Links in the associated Business Account. Brokers and warehouse operators can view System Messages, Secondary Notices (Manifest Forwards), and Useful Links in its associated Business Account. |
User statuses in the Portal:
| Active | An Active status gives the user the ability to benefit from the functionality they have been granted by the Account Owner or Proxy Account Owner of the Business Account. |
|---|---|
| Suspended | A Suspended status removes the user's ability to benefit from the functionality initially granted by the Account Owner or Proxy Account Owner of the Business Account. |
2.5.4 Assigning user roles and statuses
This section outlines the steps for assigning user roles and statuses.
Only an Account Owner or Proxy Account Owner can assign user roles or statuses.
Features by user role:
| Features | Account Owner | Proxy Account Owner | Account User | Account Browser |
|---|---|---|---|---|
| Create/edit My Profile | Available | Available | Available | Available |
| Add/update a Business Account | Available | |||
| Add/edit/suspend/remove a Proxy Account Owner | Available | |||
| Add/edit/suspend/remove an Account User and an Account Browser | Available | Available | ||
| Create/submit/edit/save a Trade Document | Available | Available | Available | |
| Search/view a Trade Document | Available | Available | Available | Available |
| Search /view a Secondary Notice | Available | Available | Available | Available |
| Delete a Secondary Notices | Available | Available | Available | |
| Print/download a Lead Sheet | Available | Available | Available | Available |
| Print /download a Section 12(1) Report | Available | Available | Available | Available |
| Create/edit/delete a Lookup | Available | Available | Available | |
| Search/view a Lookup | Available | Available | Available | Available |
| Create/edit/delete a Useful Link | Available | Available | Available | |
| View a Useful Link | Available | Available | Available | Available |
| View a System Message | Available | Available | Available | Available |
User Role:
Before you start: You will need the user's URN, family name and e-mail address entered in their profile.
- Select the Business Account from the Business Accounts top bar menu (see Figure 2-15).
Figure 2-15 Business Account Tab

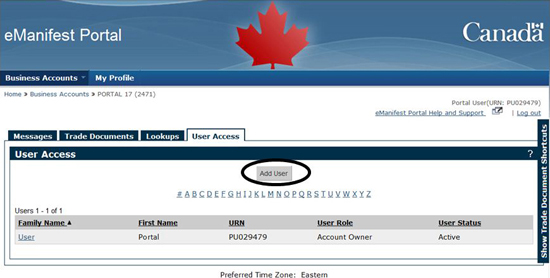
- Select User Access tab (see Figure 2-16).
Figure 2-16 User Access tab

- Select Add User (see Figure 2-17).
Figure 2-17 User Access tab - Add User page
- Enter the user's URN, last name and e-mail address (see Figure 2-18).
- Select Submit (see Figure 2-18).
Figure 2-18 User Access tab - Add User - Step 1 of 2

- Review the user information displayed (see Figure 2-19).
- Select a user role for the user.
- Select Submit (see Figure 2-19).
Figure 2-19 User Access tab - Add User - Step 2 of 2

- A User Added message will appear to confirm that the user has been added.
- Select OK.
To edit the User Status see section 9.1 of this guide.
3.0 Using the Portal
3.1 Navigating the Portal
The following are the standard information and navigation features that you will find on every Portal page. You will see this page after your User Account has been created and the Account Owner has added you to a Business Account (see Figure 3-1).
Figure 3-1 Messages tab - System Messages and Useful Links

| Option | Description |
|---|---|
| 1. CBSA Top and bottom Menu Bar | If you select any of the CBSA menu bar options you will be prompted to confirm that you want to close your Portal session before being taken to the selected web site. |
| 2. Navigation Path | Provides links back to the previous pages that you navigated through in order to get to the current page. You can select any of the links in the path to go directly to that page. |
| 3. Portal Top Bar | Provides access to your Business Accounts and to your profile information (My Profile). |
| 4. Show/Hide Trade Document Shortcuts Sidebar |
Show Trade Document Shortcuts Sidebar - Allows you to show the sidebar and consists of a shortcut to create Trade Documents. The sidebar remains open until you select Hide Trade Document Shortcuts Sidebar. Hide Trade Document Shortcuts Sidebar - Allows you to hide the sidebar. The sidebar remains hidden until you select Show Trade Document Shortcuts Sidebar or until your next Portal session. |
| 5. |
Provides access to help information for this screen. |
| 6. Tabs | A navigation tool that allows you to quickly access a major area of functionality in the Portal, e.g. Trade Documents. |
| 7. eManifest Portal Help and Support | Takes you to the eManifest Portal Help and Support page on the CBSA Web site to access Portal help information and documents. A new browser window will open when this link is selected. |
| 8. Log out | Allows you to log out of the Portal and end your session. |
| 9. Name and URN (User Reference Number) | Your name and URN. Your URN is a system-generated number that uniquely identifies you as a Portal user. |
| 10. Terms and conditions | Takes you to the terms and conditions of the CBSA web site (previously Important notices). |
| 11. Transparency | Takes you to the Proactive Disclosure on the CBSA Web site. |
4.0 System Messages
When beginning your Portal session it will open by default to the Messages tab.
Under the Messages tab, you will see System Messages sent by the CBSA to Portal users of a Business Account. These messages include, for example, changes to regulations or policy and systems maintenance messages and are not related to the status of Trade Documents.
You can view, print and download System Messages.
4.1 Viewing System Messages
If there are no System Messages, the following will be displayed: Message list is empty.
Messages are listed in the order in which they are received, starting with most recent at the top.
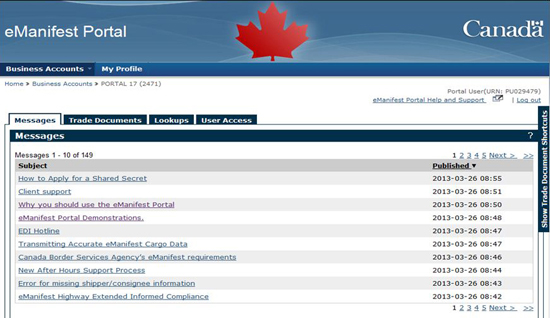
Start at: Messages tab for the selected Business Account (see Figure 4-1).
To view the body of a message, select the applicable link in the Subject column (see Figure 4-1).
Figure 4-1 Messages tab - System Messages List
4.2 Navigating System Messages
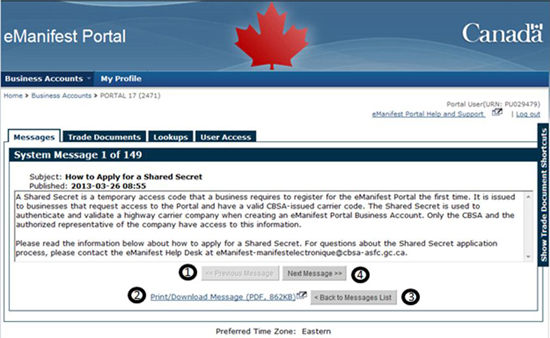
The navigation options outlined below are available on all System Messages (see Figure 4-2).
| Option | Description |
|---|---|
| 1. Previous Message | Select to view the previous message in the System Messages list. |
| 2. Print/Download Message | Select to open the message as a PDF file and either print or save the message. The PDF file opens in a new browser window. |
| 3. Back to Messages List | Select to return to the Messages tab. |
| 4. Next Message | Select to view the next message in the System Messages list. |
Figure 4-2 Messages tab - System Message
5.0 Useful Links
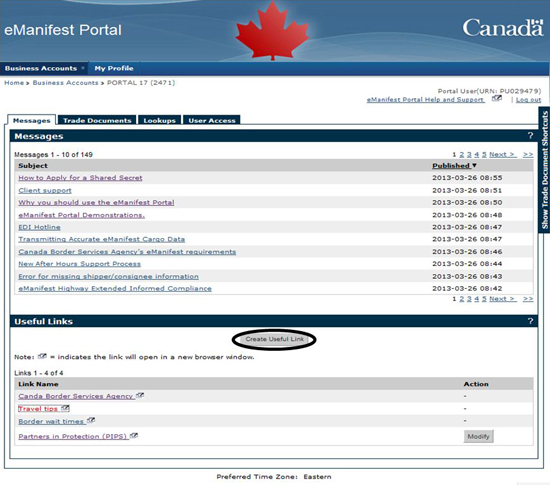
Useful Links are similar to bookmarks or favourites in a Web browser. They can be created by users in a Business Account or by the CBSA.
Useful Links are found on the Messages tab of the Portal.
User-created Useful Links are displayed alphabetically.
5.1 Opening a Useful Link
The links at the top of the list are created and maintained by the CBSA and cannot be modified or removed.
Portal users can create a Useful Link.
Once a Useful Link is created, all users in the selected Business Account can view and access the link.
A maximum of 50 user-created links can be displayed per Business Account in addition to the links created by the CBSA.
Once a Useful Link is selected, the associated Web site will open in a new browser window. Your Portal session remains active.
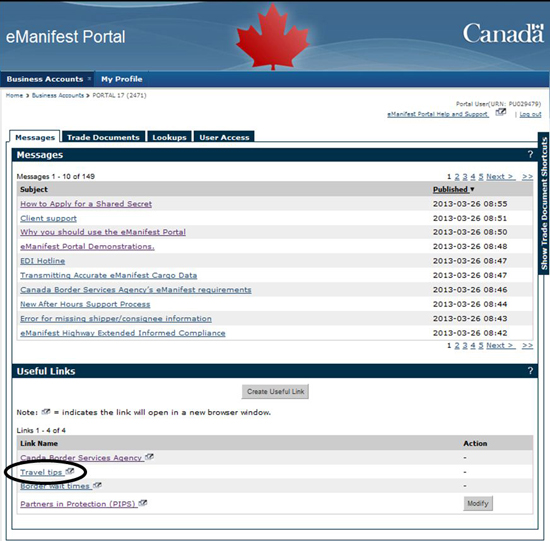
Start at: Messages tab for the selected Business Account (see Figure 5-1).
- From the Link Name column, select the link that you want to open (see Figure 5-1).
Figure 5-1 Messages tab - Useful Links section
- The associated Web site will open in a new browser window.
- Close the new browser window when you have finished viewing the information (see Figure 5-2).
Figure 5-2 Messages tab - Useful Links and new browser window

5.2 Creating a Useful Link
This section outlines the steps for creating a Useful Link for your selected Business Account.
Once created, all users in the selected Business Account can view and access the link.
Start at: Messages tab for the selected business account (see Figure 5-3).
- Select Create Useful Link (see Figure 5-3).
Figure 5-3 Messages tab - Useful Links section (Create Useful Link)
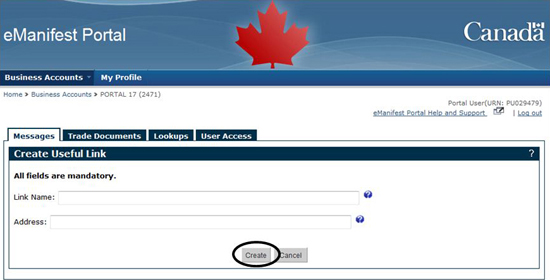
- In the Link Name field, enter a name for the link that you want displayed in the Portal.
- In the Address field, enter or copy and paste the URL (Web site address) that you want to be associated with the link name.
- Select Create (see Figure 5-4).
Figure 5-4 Messages tab - Create Useful Link page
- The Useful Link Created page is displayed, confirming that the link has been created.
- Select OK. The Messages tab is displayed and the new Useful Link will now be visible on the list of Useful Links.
5.3 Modifying a Useful Link
This section outlines the steps for modifying an existing Useful Link for your selected Business Account.
Start at: Useful Links section on the Messages tab for the selected Business Account.
- Under the Action column, select Modify for the link that you want to change (see Figure 5-5).
Figure 5-5 Messages tab - Modify Useful Links

- The Modify Useful Link page is displayed (see Figure 5-6).
- Select Edit.
Figure 5-6 Messages tab - Modify Useful Link page
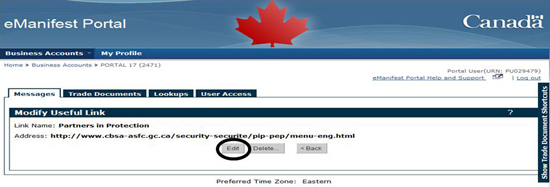
- The Edit Useful Link page is displayed (see Figure 5-6).
- Make the changes to the Link Name and/or Address fields, as required.
- Select Save (see Figure 5-7).
- The Useful Link Updated page is displayed, confirming that the link has been updated.
Figure 5-7 Messages tab - Edit Useful Link page

- Select OK. The Messages tab for the selected Business Account is displayed.
5.4 Deleting a Useful Link
This section outlines the steps for deleting an existing Useful Link.
Start at: Useful Links section of the Messages tab.
- Under the Action column, select Modify for the link that you want to delete (see Figure 5-3). The Modify Useful Link page is displayed (see Figure 5-8).
- Select Delete (see Figure 5-8).
Figure 5-8 Messages tab - Delete Useful Link
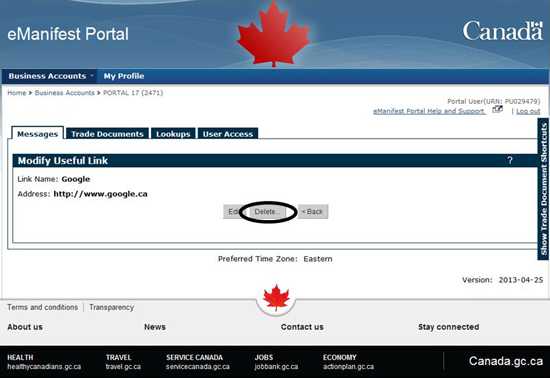
- The Delete Useful Link page is displayed.
- Confirm that you want to delete the link by selecting Yes. The Messages tab for the selected Business Account is displayed.
6.0 Trade Documents
Highway carriers:
Highway carriers using the Portal to transmit pre-arrival data to the CBSA will complete and submit Trade Documents (Highway Cargo Documents, Highway Conveyance Documents and Combined Highway Documents).
This section of the user guide outlines the steps for creating, submitting, editing, and cancelling your Trade Documents.
Freight forwarders:
Freight forwarders using the Portal to transmit pre-arrival data to the CBSA will complete and submit Trade Documents (House bills and Close Messages).
Although this section of the user guide only outlines the steps for creating, submitting and editing Trade Documents used by carriers, it can be useful in assisting with the creation, submission and edits of Trade Documents used by Freight Forwarders.
6.1 Types of Trade Documents created in the Portal
The three different Trade Documents used by highway carriers in the Portal are:
| Highway Cargo Document | A Highway Cargo Document represents the initial record of a shipment that will arrive in Canada and enables the CBSA to control the movement of imported goods. This type of document is also known as a Cargo Control Document (CCD) and is identified by a Cargo Control Number (CCN). |
|---|---|
| Highway Conveyance Document | A Highway Conveyance Document provides information about the vehicle being used to transport goods entering Canada. This document is identified by a Conveyance Reference Number (CRN). |
| Combined Highway Document | A Combined Highway Document merges a Highway Cargo Document and a Highway Conveyance Document into a single document for easier data entry. However, once submitted through the Portal, the Combined Highway Document is split into one Highway Conveyance (identified by a CRN) and one Highway Cargo Document (identified by a CCN) by the CBSA's system for processing as separate Trade Documents. Note: If you wish to check the status of your Combined Highway Document you must check the Highway Cargo and Highway Conveyance Document statuses separately. |
A Combined Highway Document can only be used if there is one CRN, one CCN (one consignee and one shipper) and cargo is located either in the Tractor, Trailer or Container. If there is a Container on a Trailer, both the Trailer and Container information must be provided. Anything other than this combination requires the user to submit separate Highway Cargo and Highway Conveyance Documents.
Your submitted Highway Cargo Documents must be accepted by the CBSA prior to your submission of a Highway Conveyance Document (unless it is an empty conveyance or only carrying goods qualifying as an exception). Failure to do so will lead to a rejection of your Highway Conveyance Document by the CBSA.
Mandatory Fields: These fields must be completed prior to submitting your Trade Document to the CBSA.
Trade Documents must be received and validated by the CBSA at least one hour prior to arrival at the First Canadian Port of Arrival (FPOA).
For a complete description of the data elements and the business rules for Trade Documents, highway carriers may refer to the ECCRD - Chapter 7: Advance Commercial Information (ACI)/eManifest Highway Portal and freight forwarders may refer to the Electronic Commerce Client Requirements Document (ECCRD) – Chapter 8: Advance Commercial Information (ACI)/eManifest Portal - House Bills.
6.2 Navigating the Trade Documents tab
The navigation options outlined below are available when working in the Trade Documents tab (see Figure 6-1).
Refer to individual sections within this Guide for details on each option.
Figure 6-1 Trade Documents tab

| Option | Description |
|---|---|
| 1. Create Trade Document | Allows highway carriers to create a Highway Cargo, Highway Conveyance or Combined Highway Document. See section 6.3 of this Guide. |
| 2. Search Submitted Trade Documents | Allows you to search for a previously submitted Trade Document. See section 6.5.3 of this Guide. |
| 3. Submitted Documents | Provides you with a list of Trade Documents that have been sent using the Portal to the CBSA. This list also includes data transmitted using Electronic Data Interchange (EDI). See section 6.5 of this Guide. |
| 4. Draft Documents | Provides you with a list of all Trade Documents that have been partially completed and not yet submitted to the CBSA. See section 6.4 of this Guide. |
| 5. Secondary Notice | Provides you with a list of House bill Manifest Forwards that have been sent to you by a Trade Chain Partner. See section 6.9 of this Guide. |
| 6. Trade Documents Shortcuts | Provides you with a list of shortcuts to creating any type of Trade Document available to the user. See section 6.3 of this Guide. |
You can browse or scroll through the lists of documents under the Draft Documents, Submitted Documents and Secondary Notices tabs. If a list cannot be presented on one page, you can navigate to the next, or previous page, by selecting the Previous, 1 2… or Next option.
All lists can be sorted (in ascending or descending order) by selecting the Saved Date/Time, Status Date/Time or Notice Date/Time column headings (see section 6.5.4).
6.3 Creating a Trade Document - Highway Carriers
This section outlines the information within the Trade Documents tab and how to navigate within the tab to create different types of Trade Documents.
It is not recommended to have multiple users editing the same Trade Document.
6.3.1 Creating a Trade Document - Highway Carriers
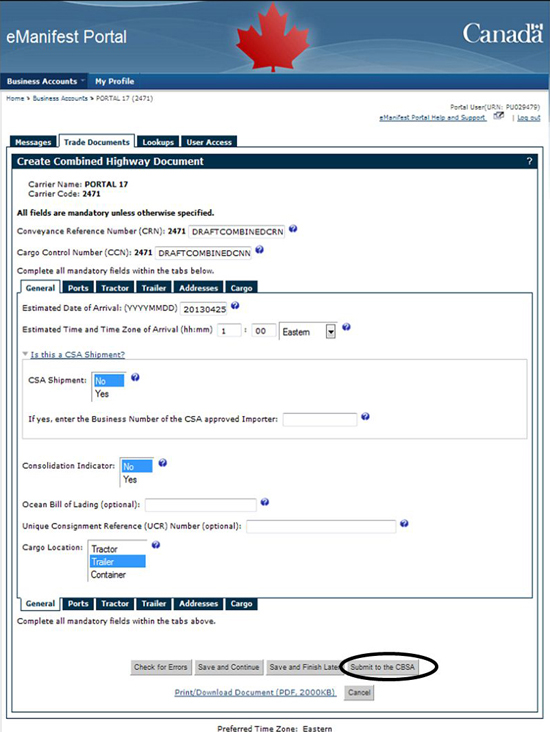
The following are the required data elements and navigation features within the Trade Documents tab when creating Trade Documents (see Figure 6-2).
Figure 6-2 Trade Documents tab - Create Combined Highway Document
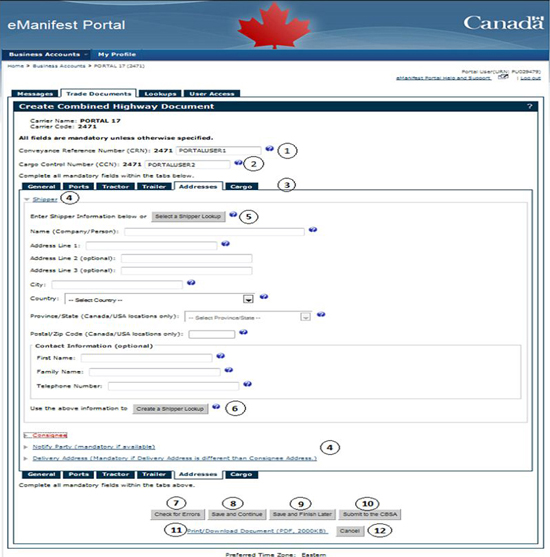
| Document type | Description of information required | |
|---|---|---|
| 1 | Combined Highway Document and Highway Conveyance Document | Conveyance Reference Number (CRN) |
| 2 | Combined Highway Document and Highway Cargo Document | Cargo Control Number (CCN) |
| 3 | General Ports Tractor Trailer Addresses Cargo |
These are the primary tabs containing required data necessary for creating Trade Documents. |
| Addresses tab - Fields | ||
|---|---|---|
| 4 | Shipper Consignee Notify Party Delivery Address |
These Addresses tab fields contain required data. |
| Function/Navigation | Description | |
|---|---|---|
| 5 | Select a Shipper Lookup | Search for and select a previously saved Shipper Lookup. The Select Lookup function is also available in other areas of the Portal. See section 7.0 of this Guide for details. |
| 6 | Create a Shipper Lookup | Create the shipper data entered as a Lookup for future use. The Create Lookup function is available in other areas of the Portal. See section 7.0 of this Guide for details. |
A Lookup is a feature of the Portal designed to save time by allowing users to create and store frequently used data for reuse. This can be done for Trailer, Tractor, Shipper, Consignee, Notify Party, Delivery Address and Trade Document. See section 7.0 of this Guide.
| Function/Navigation | Description | |
|---|---|---|
| 7 | Check for Errors | Checks your document for input errors such as no data in mandatory fields or invalid characters entered. Note: The entire Trade Document is checked for input errors, not just the tab that you are working on. Note: The Check for Errors feature will run automatically when you select Submit to the CBSA. |
| 8 | Cancel | Cancels the creation of the Trade Document. You will be asked to confirm the cancellation. Note: No data is saved when you cancel. |
| 9 | Save and Finish Later | Saves a version of the Trade Document you are creating for future use. You will receive a message confirming that your document has been saved as a draft. Note: To access the saved version of the Trade Document, navigate to the Draft Documents tab. |
| 10 | Submit to the CBSA | Transmits your Trade Document to the CBSA. The document is automatically checked for input errors. All errors must be corrected before the document can be transmitted. |
| 11 | Save and Continue | Saves a version of the Trade Document you are creating without navigating away from the Trade Document. The name of the document will be the CCN for a Highway Cargo Document or the CRN for a Highway Conveyance Document. For a Combined Highway Document, the document name will be the CCN. |
| 12 | Print/Download Document | Access a PDF version of your Trade Document. You can then print the document and/or save it in your business' records maintenance system. Note: The PDF document will open in a new browser window. |
6.3.2 Creating a Combined Highway Document
This section outlines the steps for creating and submitting a Combined Highway Document to the CBSA.
If you choose to submit a Combined Highway Document, please ensure that the CRN and CCN that you enter are different. If the numbers are identical this will generate an error message when submitting the Combined Highway Document.
Maximum number of drafts: The Portal will store a maximum of 100 Draft Trade Documents per Business Account. You will see a note on the Draft Documents page telling you how many more Draft Documents you can create and store. If the system indicates you have no more room, you must delete a Draft Document before you can begin to create a new one.
Start at: Trade Documents tab.
- Select Create Trade Document (see Figure 6-3).
Figure 6-3 Trade Documents tab - Create Trade Document

- From the selection box, select Combined Highway Document (see Figure 6-4).
- Select Submit (see Figure 6-4).
Figure 6-4 Trade Documents tab - Create Trade Document (Combined Highway Document)
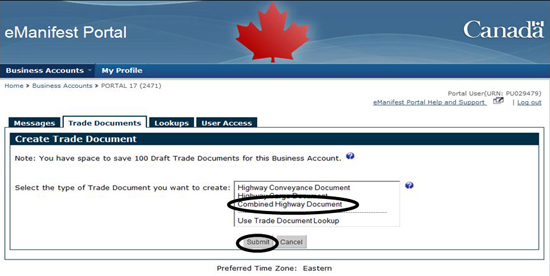
Another path to creating a Trade Document is as follows: starting from any of the main tabs (Messages, Trade Documents, Lookups or User Access), select the "Show Trade Document Shortcuts" side bar and select Create Combined Highway Document (see Figure 6-1, item 6).
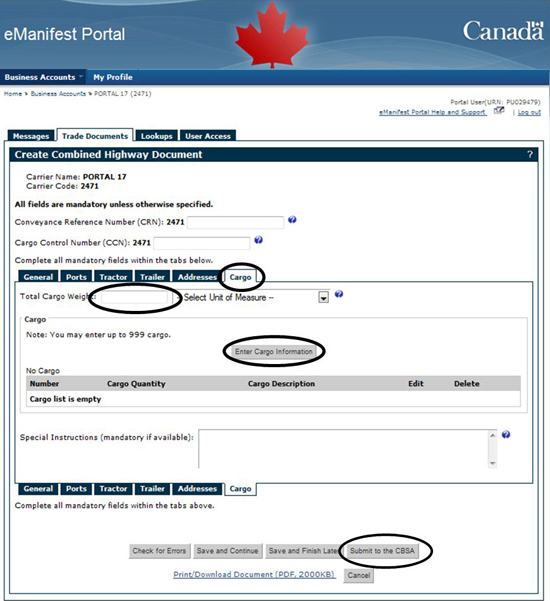
- Complete all tabs (General, Ports, Tractor, Trailer, Addresses, and Cargo) and mandatory fields (see Figure 6-5).
If you have additional cargo being transported under one CCN (one consignee and one shipper), select Enter Cargo Information.
- Select Submit to the CBSA (see Figure 6-5).
Figure 6-5 Trade Documents tab - Create Combined Highway Document (Cargo tab)
- If no errors are detected, a submission confirmation message will appear. Select Yes to continue or No to cancel the Trade Document submission.
- If Yes was selected, a Submitted to the CBSA message will be displayed under the Trade Documents tab confirming the Combined Highway Document was successfully submitted.
- Select OK (see Figure 6-6).
Figure 6-6 Trade Documents tab - Submitted to the CBSA (Combined Highway Document)
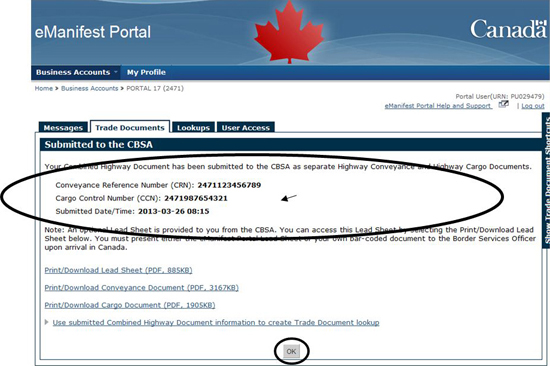
You can print or download the Lead Sheet, the Conveyance Document and/or the Cargo Document by selecting the associated link (see section 6.8 of this Guide).
You can also choose to select the option Use submitted Combined Highway Document information to create Trade Document Lookup for which you need to provide a Lookup name (see section 7.2.3 of this Guide).
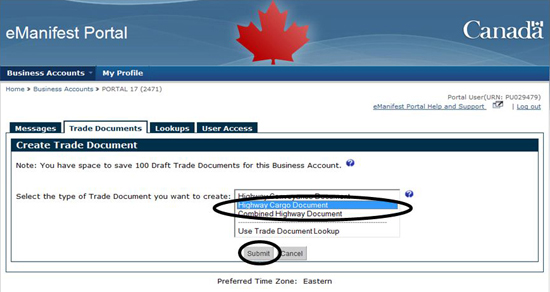
6.3.3 Creating a Highway Cargo Document
This section outlines the steps for creating and submitting a Highway Cargo Document to the CBSA.
Order of submission: All Highway Cargo Documents must be submitted to and accepted by the CBSA before submitting the Highway Conveyance Document to which the cargo will link. Failure to do so will lead to a rejection of your Highway Conveyance Document by the CBSA.
The cargo will not link if your Highway Conveyance Document is an empty conveyance or only carrying goods qualifying as an exception.
If a Highway Cargo Document is created using a previously submitted CCN, the system will reject the Trade Document as a duplicate. The document will then be available on the Submitted list. Users can only resubmit the document to the CBSA once they have modified the CCN.
Start at: Trade Documents tab.
- Select Create Trade Document (see Figure 6-3).
- From the selection box, select Highway Cargo Document (see Figure 6-7).
- Select Submit (see Figure 6-7).
Figure 6-7 Trade Documents tab - Create Trade Document (Highway Cargo Document)
Another path to creating a Trade Document is as follows: starting from any of the main tabs (Messages, Trade Documents, Lookups or User Access), select the "Show Trade Document Shortcuts" side bar and select "Create Highway Cargo Document" (see Figure 6-1, item 6).
- Complete all tabs (General, Ports, Addresses, Cargo) and mandatory fields (see Figure 6-8).
- Select Submit to the CBSA (see Figure 6-8).
Figure 6-8 Trade Documents tab - Create Highway Cargo Document (Cargo tab)

- If no errors are detected, a submission confirmation will appear. Select Yes to continue or No to cancel the Trade Document submission.
- If Yes was selected, a Submitted to the CBSA message will be displayed under the Trade Documents tab confirming the Highway Cargo Document was successfully submitted (see Figure 6-9).
- Select OK (see Figure 6-9).
Figure 6-9 Trade Documents tab - Submit to the CBSA (Highway Cargo Document)

You can print or download the Highway Cargo Document by selecting the associated link (see section 6.8.1 of this Guide).
You can also choose to select the option Use submitted Highway Cargo Document information to create Trade Document Lookup for which you need to provide a Lookup name (see section 7.2.3 of this Guide).
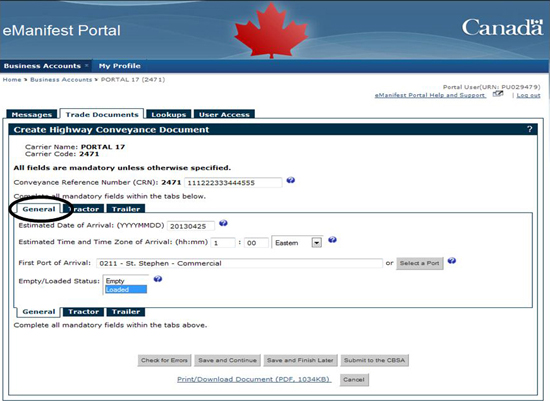
6.3.4 Creating a Highway Conveyance Document
This section outlines the steps for creating, adding Cargo and submitting a Highway Conveyance Document to the CBSA.
If a Highway Conveyance Document is created using a previously submitted CRN, the system will reject the Trade Document as a duplicate. The document will then be available on the Submitted list and only once the users have modified the CRN can they resubmit the document to the CBSA.
Start at: Trade Documents tab.
- Select Create Trade Document (see Figure 6-3).
- From the selection box, select Highway Conveyance Document (see Figure 6-10).
- Select Submit (see Figure 6-10).
Figure 6-10 Trade Documents tab - Create Trade Document (Highway Conveyance Document)

Another path to creating a Trade Document is as follows: starting from any of the main tabs (Messages, Trade Documents, Lookups or User Access), select the "Show Trade Document Shortcuts" side bar and select Create Highway Conveyance Document (see Figure 6-1, item 6).
- Complete all mandatory fields within the General tab (see Figure 6-11).
Figure 6-11 Trade Documents tab - Create Highway Conveyance Document
- You will need to complete the fields within either or both the Tractor and Trailer tabs as required.
All submitted and accepted Highway Cargo Documents (CCNs) should be linked to either one, or both of, the Tractor and Trailer tabs as required. The process and available options for linking CCN(s) are the same in both tabs. For the purpose of this example, the Trailer tab has been selected to describe how to link cargo to the Highway Conveyance Document and add another container.
- Select Enter Trailer Information (see Figure 6-12).
Figure 6-12 Trade Documents tab - Enter Trailer Information

- Enter the Trailer information (see Figure 6-13).
Figure 6-13 Trade Documents tab - Enter Trailer Information #01
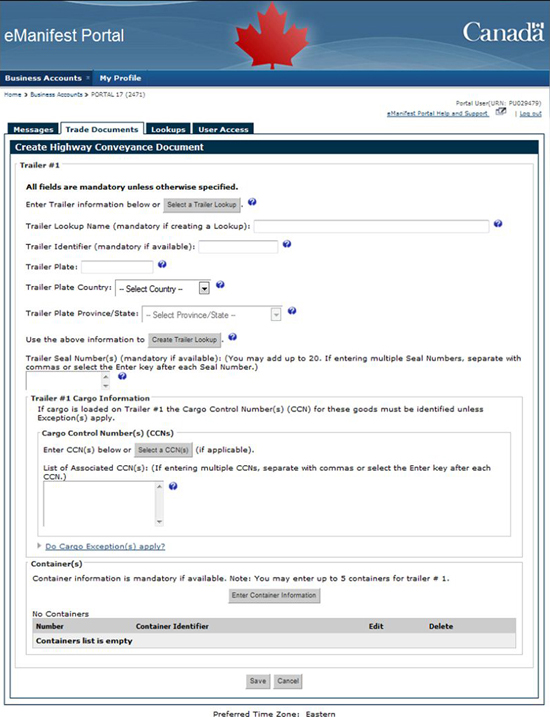
- Link all related Cargo Documents to this conveyance and select Select (see Figure 6-14).
You can add Highway Cargo Documents to the Highway Conveyance Document manually by entering the known CCN(s), or you can use the Select a CCN(s) option to link to the Highway Conveyance Document from the Unassociated CCN(s) list (see Figure 6-14).
Figure 6-14 Trade Documents tab - Select a CCN(s)

- Enter any Cargo Exceptions if applicable (see Figure 6-15).
If cargo is loaded on Trailer #01, the Cargo Control Number(s) (CCN) for these goods must be identified unless exception(s) apply.
Figure 6-15 Trade Documents tab - Highway Conveyance Document (Trailer tab)

- Select Save (see Figure 6-15).
- Select Submit to the CBSA.
- If no errors are detected, a submission confirmation will appear. Select Yes to continue or No to cancel the Trade Document submission.
- If Yes was selected, a Submitted to the CBSA message will be displayed under the Trade Documents tab confirming the Highway Conveyance Document was successfully submitted.
- Select OK (see Figure 6-16).
Figure 6-16 Trade Documents tab - Highway Conveyance Document (Submit to the CBSA)

You can print or download the Lead Sheet and/or the Highway Conveyance Document by selecting the associated link (see section 6.8 of this Guide).
You can also choose to select the option Use submitted Highway Conveyance Document information to create Trade Document Lookup for which you need to provide a Lookup name (see section 7.2.3 of this Guide).
6.4 Draft Documents tab
The Draft Documents tab provides you with a list of all Draft Trade Documents previously saved by all users in your Business Account.
When you select the option to Save and Finish Later or Save and Continue while creating a Trade Document, your document is saved as a Draft Trade Document in the Portal and is available for future editing.
The figure below provides an overview of the column heading names within the Draft Documents tab (see Figure 6-17).
Figure 6-17 Trade Documents tab - Draft Documents tab (Column Headings)

| Column Heading | Description | |
|---|---|---|
| 1 | Document Number | The CCN or CRN of the associated document. For a Combined Highway Document, this column will display the CRN, if available. If this data has not been provided in the document, the carrier code will be displayed. |
| 2 | Document Type | Indicates the type of Draft Trade Document:
|
| 3 | Saved Date/Time | The date and time the Draft Trade Document was saved. |
| 4 | Action | Allows you to delete the Draft Trade Document from the Draft Documents list. |
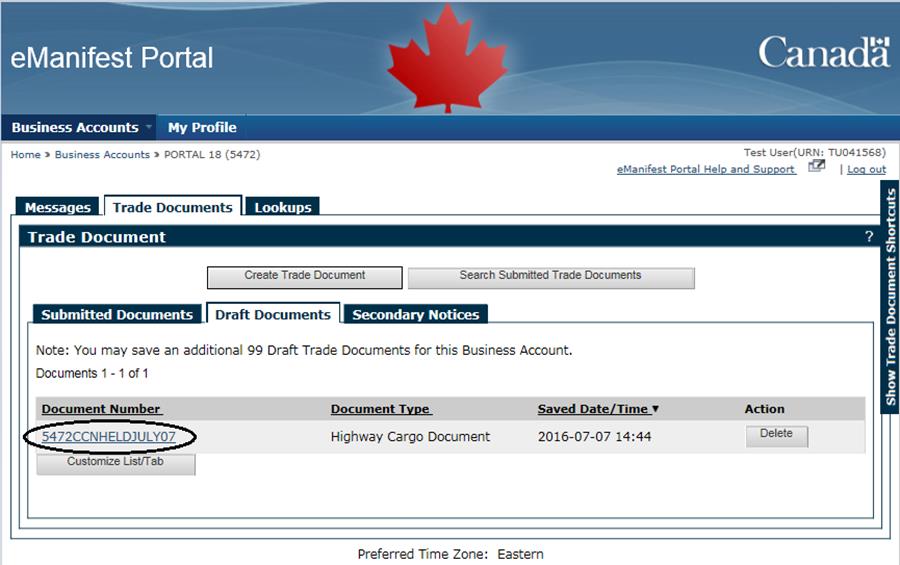
6.4.1 Completing a Draft Trade Document
You can complete any of the available Draft Trade Documents from the list within the Business Account.
It is recommended that only one user edits a Draft Trade Document at a time as only one user's data can be saved or submitted.
Selecting Delete will permanently remove the Trade Document from your Business Account. You are prompted to confirm or cancel the Delete action.
Start at: Trade Documents tab.
- Select the Draft Documents sub-tab. In the first column of the Draft Trade Documents, select the Document Number of the Trade Document that you want to complete (see Figure 6-18).
Figure 6-18 Trade Documents tab - Draft Documents tab
- Complete all tabs and remaining fields in the selected Trade Document.
- Select Submit to the CBSA (see Figure 6-19).
Figure 6-19 Trade Documents tab - Combined Highway Document
If you are submitting a Combined Highway Document, proceed to section 6.3.2, step 6.
If you are submitting a Highway Cargo Document, proceed to section 6.3.3, step 6.
If you are submitting a Highway Conveyance Document, proceed to section 6.3.4, step 11.
6.4.2 Customizing the Draft Documents List/Tab
You can change the number of documents displayed on the Draft Documents list with the Customize Draft Documents List function.
By default, 10 documents are displayed on each Draft Documents page.
Start at: Trade Documents tab.
- Select the Draft Documents sub-tab and then Customize List/Tab (see Figure 6-20).
Figure 6-20 Trade Documents tab - Draft Document - Customized List/Tab

- Under Customize Draft Documents List, select the number (10, 25 or 50) of documents you want to be displayed (see Figure 6-21).
- Select Save (see Figure 6-21).
Figure 6-21 Trade Documents tab - Draft Document - Save Customization

- Select OK to save your customized settings.
You can customize the Trade Document sub-tab default in the Trade Documents tab with the Customize Trade Document Tab function.
By default, the Submitted Documents sub-tab will appear when selecting the Trade Documents tab.
Start at: Trade Documents tab.
- Select the Draft Documents sub-tab and then Customize List/Tab (see Figure 6-20).
- Under Customize Trade Document Tab, select the default sub-tab between: Submitted Documents, Draft Documents and Secondary Noticess (see Figure 6-21).
- Select Save (see Figure 6-21).
- Select OK to save your customized settings.
You can customize the Submitted Documents list filtering default in the Trade Documents tab with the Customize Trade Document Tab function.
By default, the Submitted Documents List filtering is set to All, Current, Highway Conveyance Document.
Start at: Trade Documents tab.
- Select the Draft Documents sub-tab and then Customize List/Tab (see Figure 6-20).
- Under Customize Trade Document Tab, select your default Submitted Documents List filtering preferences by selecting the:
- Status (All, Accepted, Acquitted, Arrived, Authorized to Deliver, Cancelled, Cargo Complete, Deconsolidated, Document Package Complete, Held for CBSA, Matched, Not Matched, Rejected, Released, Reported or Updating…)
- Status (Current or Historical); and,
- Trade Document type (Highway Conveyance Document or Highway Cargo Document) (see Figure 6-21).
- Select Save (see Figure 6-21).
- Select OK to save your customized settings.
6.5 Submitted Documents tab
All electronic data transmitted to the CBSA will be available in the Portal, whether submitted through the Portal or by EDI. Electronic data can be viewed, changed/amended or cancelled and their status verified within the Submitted Documents tab.
Up to 1000 of your most recent Submitted Trade Documents will be displayed for each document type, based on the Status Date and Time of the Trade Document.
When you select the Submitted Documents tab, the list of documents shown by default is the current Highway Conveyance Documents for highway carriers and is the current Close Messages for freight forwarders. The list is sorted by the Status Date/Time column, with the most recent date/time at the top of the list.
If your company submits a very high volume of Trade Documents to the CBSA (whether through the Portal or EDI), the CBSA system may not be able to present a list of your most recent Trade Documents. If this is the case, use the Search Submitted Trade Documents feature in the Trade Documents tab to locate documents by Cargo Control Number or Conveyance Reference Number for highway carriers and by Cargo Control Number or Close Message Number for freight forwarders.
The following table provides an overview of the data presented for each view of Submitted Documents:
| Column Name | Highway Conveyance | Highway Cargo | ||
|---|---|---|---|---|
| Current | Historical | Current | Historical | |
| Conveyance Reference Number (CRN) | Available | Available | ||
| Cargo Control Number (CCN) | Available | Available | ||
| Estimated Date/Time of Arrival | Available | Available | Available | Available |
| Number of Associated CCNs | Available | Available | ||
| Tractor Plate | Available | Available | ||
| Status Date/Time | Available | Available | Available | Available |
| Status | Available | Available | Available | Available |
| Consignee Name | Available | Available | ||
| Submitted Date/Time | Available | Available | Available | Available |
| Consolidated Freight | Available | Available | ||
| First Port of Arrival | Available | Available | ||
| Shipper Name | Available | Available | ||
| Source of Transmission | Available | Available | Available | Available |
6.5.1 Navigating the Submitted Documents tab
This section contains figures and tables that provide an overview of the Submitted Documents tab, navigation features, the data that can be accessed and the available functions (see Figure 6-22 and Figure 6-23).
Figure 6-22 Trade Documents tab - Submitted Documents tab (Highway Conveyance Documents)
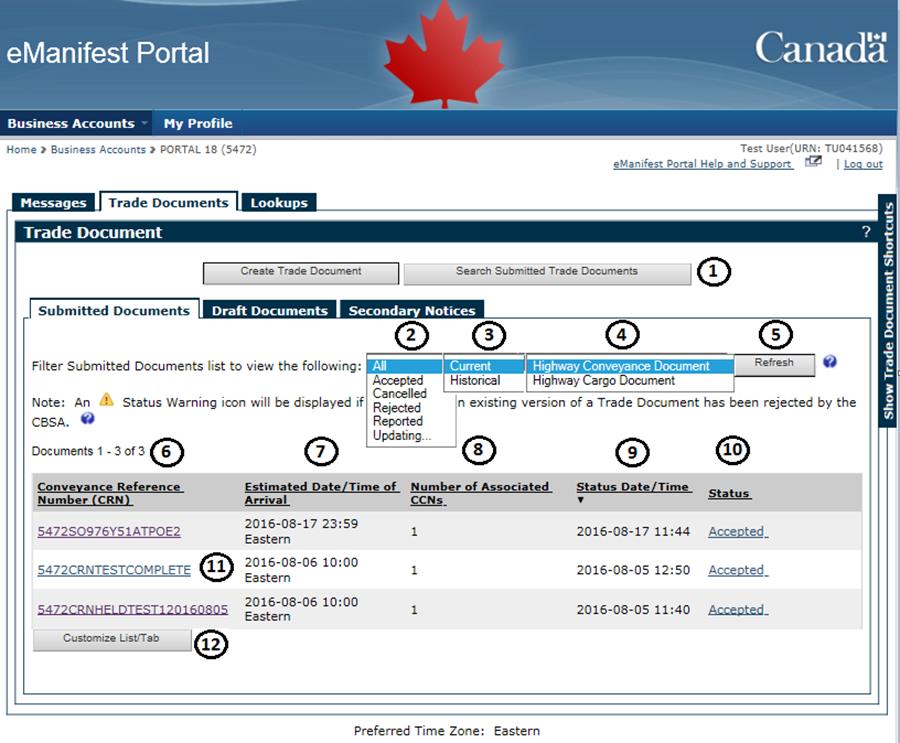
Figure 6-23 Trade Documents tab - Submitted Documents tab (Highway Cargo Documents)

| 1 | Search Submitted Trade Documents | Allows you to search for a specific previously submitted Trade Document. See section 6.5.3 of this Guide for detailed procedures. |
Filtering Submitted Documents allows you to specify criteria which will narrow the type of Trade Documents displayed in the list. The following table summarizes the filter options, the column headings for the different lists and the available functions.
| Filter Options | Description | |
|---|---|---|
| Status | The Status represents the latest status of the Trade Document. | |
|
All submitted Trade Documents Statuses will be displayed. | |
|
Indicates a Trade Document has passed validation checks and has been accepted by the CBSA. | |
|
Indicates goods are no longer controlled by a Highway Cargo Document (for highway carriers). Indicates goods are no longer controlled by a House bill (for freight forwarders). |
|
|
Indicates the client’s Cargo has arrived at its Port of Destination (for highway carriers). Indicates that the client’s House bill has arrived at its Port of Destination (for freight forwarders). |
|
|
Indicates the CSA goods can be delivered to the intended recipient. | |
|
Indicates a Trade Document submission has been cancelled by the client or internally by the CBSA. | |
|
Indicates a non-consolidated Primary Cargo Document has been transmitted to the CBSA and Accepted. If consolidated, it indicates that all of the related secondary cargo (i.e. House bills) has been transmitted as well. | |
|
Indicates that the CBSA has authorized the transfer of Cargo Control from a Previous Cargo Control Document (representing a consolidated shipment) to the related secondary House bills that were submitted to CBSA. One of the following “Authorization” messages may be displayed in the Status History Details:
(For these “Authorization” messages: |
|
|
Indicates all shipments described by a Cargo Document are linked to a pre-arrival Release. |
|
|
Indicates the cargo is being held for further determination/processing and cannot be released. | |
|
Indicates a specific Trade Document is linked to a related Trade Document (for highway carriers). Indicates a Close Message is linked to one or more House bills (for freight forwarders). |
|
|
Indicates either no links to a related Trade Document have been established, or a document that has previously been Matched to another document becomes unlinked through a change or cancellation (for highway carriers). Indicates a House bill has no links to a Close Message (for freight forwarders). |
|
|
Indicates a Trade Document has been rejected by the CBSA and the rejection reason(s) is provided. | |
|
Indicates when goods have been authorized to be removed from the CBSA office, a sufferance warehouse, or a bonded warehouse for use in Canada. | |
|
Indicates a Highway Conveyance Document and associated Highway Cargo Document(s), if applicable, have reported at First Canadian Port of Arrival as per the requirements of Section 12(1) of the Customs Act (for highway carriers). Indicates goods declared on the House bill have reported at the First Canadian Port of Arrival as per the requirements of Section 12(1) of the Customs Act (for freight forwarders). |
|
|
Indicates a Trade Document submitted to the CBSA using the Portal is being processed. | |
| Current | Submitted Trade Documents remain on the Current list for 24 hours after reaching a final Status. After the 24-hour period, the Trade Documents are moved to the Historical Documents list. | |
| Historical | Trade Documents remain on the Historical list for approximately 60 days and are then removed. Once removed from the Historical list, Trade Documents may be found using the Search Submitted Documents feature. | |
| Highway Conveyance Document | Only Highway Conveyance Documents will be displayed in the list. | |
| Highway Cargo Document | Only Highway Cargo Documents will be displayed in the list. | |
| Refresh | Selecting Refresh generates and produces the requested filtered documents list. | |
| Column Headings | Description | |
|---|---|---|
| 6 | Conveyance Reference Number (CRN) | Selecting the CRN from the list will open the Trade Document. |
| 7 | Estimated Date/Time of Arrival | The estimated date and time the conveyance will arrive at the border. |
| 8 | Number of Associated CCNs | The total number of CCNs associated to the Trade Document. |
| 9 | Status Date/Time | The date and time the Trade Document was submitted. |
| 10 | Status | Displays the status of the Trade Document. |
| 11 | Trade Documents List | Trade Documents List Displays the list of Trade Documents available for the selections. |
| 12 | Customize List/Tab | Allows you to customize the look of the page. See section 6.5.4 in this Guide for detailed procedures. |
| Column Headings | Description | |
|---|---|---|
| 13 | Cargo Control Number (CCN) | Selecting the CCN from the list will open the Trade Document. |
| 14 | Consignee Name | The name of the Consignee of the cargo. |
| 15 | Estimated Date/Time of Arrival | The estimated date/time of arrival when the specified goods will first arrive in Canada. |
| 16 | Status Date/Time | The date and time the Trade Document was submitted. |
| 17 | Status | Displays the status of the Trade Document. |
| 18 | Trade Documents List | Trade Documents List Displays the list of Trade Documents available for the selections. Note: A maximum of 1000 Trade Documents for each document type can be displayed in the list. |
| 19 | Customize List/Tab | Allows you to change the appearance of the page. See section 6.5.4 in this Guide for detailed procedures. |
6.5.2 Checking the status of Submitted Trade Documents
The status of your Submitted Trade Documents with the CBSA can be found under the Trade Documents tab. To view details of a particular document, including its status history, select and open the desired document.
Status refers to the status of the latest version of a Trade Document received by the CBSA.
This section provides an overview of statuses only detailed business rules are outlined in the ECCRD - Chapter 7: Advance Commercial Information (ACI)/eManifest Highway Portal.
To check the status of your Combined Highway Document, you must check the status of the Highway Cargo and Highway Conveyance Documents separately. Once a Combined Highway Document has been submitted, it is split into one Highway Conveyance and one Highway Cargo Document for processing as separate Trade Documents. Refer to section 6.3.4 of this Guide for detailed information.
The ![]() symbol is only displayed in special circumstances in relation to the original Trade Document Submission or to Changes, Amendments or Cancellations to Highway Cargo or Highway Conveyance Documents. It means that a Carrier submission has not passed business validation checks performed by the CBSA system and that the Trade Document Submission is currently rejected by the CBSA system. If a Trade Document Submission is rejected and the
symbol is only displayed in special circumstances in relation to the original Trade Document Submission or to Changes, Amendments or Cancellations to Highway Cargo or Highway Conveyance Documents. It means that a Carrier submission has not passed business validation checks performed by the CBSA system and that the Trade Document Submission is currently rejected by the CBSA system. If a Trade Document Submission is rejected and the ![]() symbol is displayed, a Change or an Amendment must be made to that document and resubmitted to the CBSA. When a Change, Amendment or Cancel of a Trade Document is rejected and the
symbol is displayed, a Change or an Amendment must be made to that document and resubmitted to the CBSA. When a Change, Amendment or Cancel of a Trade Document is rejected and the ![]() symbol is displayed, if the previous version of the Trade Document was accepted it remains in the CBSA system until such time as the carrier resubmits the Trade Document Change, Amendment or Cancel again and passes the CBSA system’s business validation rules. If there is no accepted version, it will need to be updated until it passes the CBSA system business validation rules.
symbol is displayed, if the previous version of the Trade Document was accepted it remains in the CBSA system until such time as the carrier resubmits the Trade Document Change, Amendment or Cancel again and passes the CBSA system’s business validation rules. If there is no accepted version, it will need to be updated until it passes the CBSA system business validation rules.
If a duplicate document number has been submitted, the ![]() symbol will be displayed on the submitted list. In order to use the duplicate document data, a change to the document’s CCN or CRN will need to be done and resubmitted.
symbol will be displayed on the submitted list. In order to use the duplicate document data, a change to the document’s CCN or CRN will need to be done and resubmitted.
If a Portal user sees the ![]() symbol next to a Trade Document’s status, the user should view the Trade Document Status History. The Status History will indicate the carrier’s most recent Submission was rejected and will provide the reason(s) for the rejection. If another Change, Amendment or Cancel is submitted for the Trade Document and it passes the CBSA system’s business validation, the
symbol next to a Trade Document’s status, the user should view the Trade Document Status History. The Status History will indicate the carrier’s most recent Submission was rejected and will provide the reason(s) for the rejection. If another Change, Amendment or Cancel is submitted for the Trade Document and it passes the CBSA system’s business validation, the ![]() symbol will no longer be shown.
symbol will no longer be shown.
6.5.2.1 Status History
This section outlines the data contained within the Status History page. The Status History page provides a list of all statuses related to the selected Trade Documents as well as associated messages, including error messages (see Figure 6-24).
The Status History page can be accessed by selecting the Status of a Submitted Trade Document (see Figure 6-23, item 17).
The Status History for a Trade Document can also be downloaded and/or printed when viewing the Status History page (see Figure 6-24).
Figure 6-24 Trade Documents tab - Status History (Highway Conveyance Document)

| Section | Description | |
|---|---|---|
| 1 | Trade Document Information | For all Trade Documents, provides the following information:
|
| 2 | Status History | Provides a list of all statuses that the Trade Document has undergone since being submitted to the CBSA. Notes:
|
| 3 | Status History Details | Details of the selected document status will be displayed in Status History Details, including any Trade messages associated with the document. This allows the user to view the reason(s) a document has been rejected. |
| 4 | Print/Download Status History | To Print/Download the Status History, see section 6.8 of this Guide. The Print/Download process is the same for all available reports in the Portal. |
Submitted is displayed in your Trade Document's Status History to reflect the date and time your Trade Document was submitted to the CBSA using the Portal.
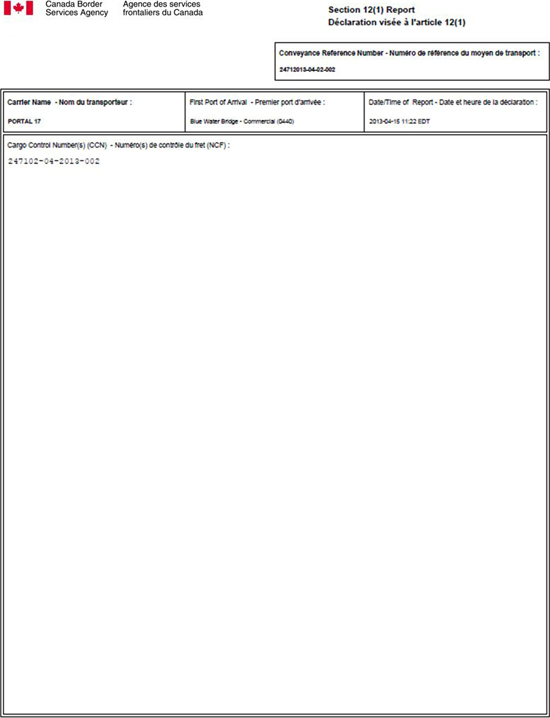
6.5.2.2 Section 12 (1) Report
Section 12(1) is part of the Customs Act. A Section 12(1) Report is available for print and/or downloads once your goods have arrived on the conveyance at the First Canadian Port of Arrival. This report is used for auditing and record-keeping purposes and is proof the imported goods have been reported to the CBSA (see Figure 6-26).
For more information, see the ECCRD - Chapter 7: Advance Commercial Information (ACI)/eManifest Highway Portal (for highway carriers).
It is your responsibility to save a copy of the Section 12(1) Report for audit purposes. The Portal should not be used to store the Section 12(1) Report or Trade Documents.
The option to download and print a Section 12(1) Report is available after the Conveyance Trade Document status is Reported.
You will be able to print and download the Section 12(1) Report by viewing the Submitted Highway Conveyance Document after the conveyance has arrived (see Figure 6-25).
Figure 6-25 Trade Documents tab - Submitted Highway Conveyance Document (Status)

Figure 6-26 Section 12(1) Report
6.5.3 Searching Submitted Trade Documents
This section outlines the different ways to search for a Submitted Document.
The Search Submitted Trade Documents function allows you to search for a specific Highway Cargo or Highway Conveyance Document that has been submitted to the CBSA. The Trade Document number (CRN or CCN) is required and only exact matches of the number will be displayed.
The full CCN or CRN must be entered. If you enter only a partial CCN or CRN, you will receive an error message. Only exact matches will be displayed. Please note that the carrier code is already entered for convenience.
The Portal will search both current and historical documents that meet your search criteria exactly as entered.
Start at: Trade Documents tab.
- Select Search Submitted Trade Documents (see Figure 6-22 - item 1).
- In Search in, select either Submitted Highway Conveyance Documents or Submitted Highway Cargo Documents. Then enter the Document Number, either the CCN or the CRN of the Trade Document you want to find (see Figure 6-27).
- Select Search (see Figure 6-27).
Figure 6-27 Trade Documents tab - Search Submitted Trade Documents

- The matching Trade Document will be displayed (see Figure 6-28).
Figure 6-28 Trade Documents tab - Submitted Trade Documents Search Results

If no matching document is found, you can either change your search criteria or cancel the search.
If the Trade Document is found in archived status, the details will not be available for viewing in the Portal. If you require a copy, contact the CBSA's Technical Commercial Client Unit (TCCU).
6.5.4 Customizing the Submitted Documents List/Tab
You can change the number of documents displayed on the Submitted Documents list with the Customize List/Tab function. By using your filter, you can choose to customize your Submitted Documents tab differently by selecting the status, version type (current or historical) and Submitted Document type.
By default, 10 documents are displayed on each Submitted Documents page.
Start at: Trade Documents tab.
- From the Submitted Documents sub-tab, by using the filter, select the Document Type you would like to customize. As an example, select All, Current and Highway Conveyance Document.
- Select Refresh.
- Select Customize List/Tab (see Figure 6-23 - item 12).
- Under Customize Submitted Current Highway Conveyance Documents List, select the number (10, 25 or 50) of documents you want displayed (see Figure 6-29).
- Select Save (see Figure 6-29).
Figure 6-29 Trade Documents tab - Customize List View

- Select OK to save your customized settings.
You can customize the List Columns displayed in the Submitted Documents tab with the List Columns function.
By default, the following columns are displayed:
Submitted Conveyance Documents: Conveyance Reference Number, Estimated Date/Time of Arrival, Number of Associated CCNs, Status Date/Time and Status.
Submitted Cargo Documents: Cargo Control Number, Consignee Name, Estimated Date/Time of Arrival, Status Date/Time and Status.
Start at: Trade Documents tab.
- From the Submitted Documents sub-tab, select Customize List/Tab (see Figure 6-22 - item 12).
- Under List Columns, select the columns you would like displayed from the following list:
- Submitted Conveyance Documents: Conveyance Reference Number, Estimated Date/Time of Arrival, Number of Associated CCNs, Status Date/Time, Status, Tractor Plate, Source of Transmission and Submitted Date/Time (see Figure 6-29).
- Submitted Cargo Documents: Cargo Control Number, Consignee Name, Status Date/Time, Status, Submitted Date/Time, Consolidated Freight, Estimated Date/Time of Arrival, First Port of Arrival, Shipper Name and Source of Transmission.
- Select Save (see Figure 6-29).
- Select OK to save your customized settings.
You can customize the Trade Document sub-tab default in the Trade Documents tab with the Customize Trade Document Tab function.
By default, the Submitted Documents sub-tab will appear when selecting the Trade Documents tab.
Start at: Trade Documents tab.
- From the Submitted Documents sub-tab, select Customize List/Tab (see Figure 6-22 - item 12).
- Under Customize Trade Document Tab, select the default sub-tab between: Submitted Documents, Draft Documents and Secondary Notices (see Figure 6-29).
- Select Save (see Figure 6-29).
- Select OK to save your customized settings.
You can customize the Submitted Documents list-filtering default in the Trade Documents tab with the Customize Trade Document Tab function.
By default, the Submitted Documents List filtering is set to All, Current, Highway Conveyance Document.
Start at: Trade Documents tab.
- From the Submitted Documents sub-tab, select Customize List/Tab (see Figure 6-22 - item 12).
- Under Customize Trade Document Tab, select your default Submitted Documents List-filtering preferences by selecting the:
- Status All, Accepted, Acquitted, Arrived, Authorized to Deliver, Cancelled, Cargo Complete, Deconsolidated, Document Package Complete, Held for CBSA, Matched, Not Matched, Rejected, Released, Reported or Updating…);
- Status (Current or Historical); and,
- Trade Document type (Highway Conveyance Document or Highway Cargo Document (see Figure 6-29).
- Select Save (see Figure 6-29).
- Select OK to save your customized settings.
6.6 Editing a Submitted Document
This section outlines how to edit (change or amend) a Submitted Trade Document. All Highway Cargo and Highway Conveyance Documents can be edited after being submitted to the CBSA.
For additional information on the Change/Amendment rules for Highway Cargo and Highway Conveyance Documents, refer to the ECCRD - Chapter 7: Advance Commercial Information (ACI)/eManifest Highway Portal.
The following example provides instructions for making an Amendment to a Submitted Highway Conveyance Document.
Start at: Trade Documents tab.
- From the Submitted Documents tab, select: Accepted, Current, Highway Conveyance Document from filter list (see Figure 6-22).
- Select Refresh.
- Select the Trade Document that you want to edit from the list of available Trade Documents (see Figure 6-22 - Item 11).
- Select Edit Document (see Figure 6-30).
Figure 6-30 Trade Documents tab - Submitted Highway Conveyance Document (Edit Document)

- Select Amendment as the Document Change/Amendment Indicator
Change or Amendment can be selected depending on the status of the Document. Refer to the ECCRD - Chapter 7: Advance Commercial Information (ACI)/eManifest Highway Portal for more information.
- Enter the correct information in the fields that need to be amended.
- Run the Check for Errors function (see Figure 6-31).
- If no errors are detected, select Resubmit to the CBSA (see Figure 6-31).
Figure 6-31 Trade Documents tab - Edit Submitted Highway Conveyance Document

- A list of Conveyance Amendment Reasons will be displayed. Select the appropriate reason (see Figure 6-32).
When submitting a post-arrival change, you must select only one reason for amendment. The amendment reasons will be listed in order of priority. When more than one reason applies to a single amendment, use only the reason that is closest to the top of the available list.
Figure 6-32 Trade Documents tab - Edit Submitted Highway Conveyance Document (Select Reason for the Amendment)

- A Resubmitted to the CBSA message will be displayed confirming that the Highway Conveyance Document was successfully resubmitted.
- Select OK (see Figure 6-33).
Figure 6-33 Trade Documents tab - Resubmitted to the CBSA

6.7 Cancelling a Submitted Document
This section outlines how to Cancel a Submitted Document.
There is a specific sequence that must be followed when cancelling a Submitted Document. The sequence depends on the status of the Trade Document, and whether it is associated with another Trade Document.
The rules and sequence for cancelling (deleting) a Submitted Document are outlined in the ECCRD - Chapter 7: Advance Commercial Information (ACI)/eManifest Highway Portal.
The following example provides instructions for cancelling a Submitted Highway Conveyance Document.
Start at: Trade Documents tab.
- From the Submitted Documents tab, select: All, Current and Highway Conveyance Document from filter list (see Figure 6-22).
- Select the Trade Document that you want to cancel from the list of available Trade Documents (see Figure 6-22 - Item 11).
- Select Cancel Submission… (see Figure 6-34).
Figure 6-34 Trade Documents tab - Submitted Highway Conveyance Document (Cancel Submission)
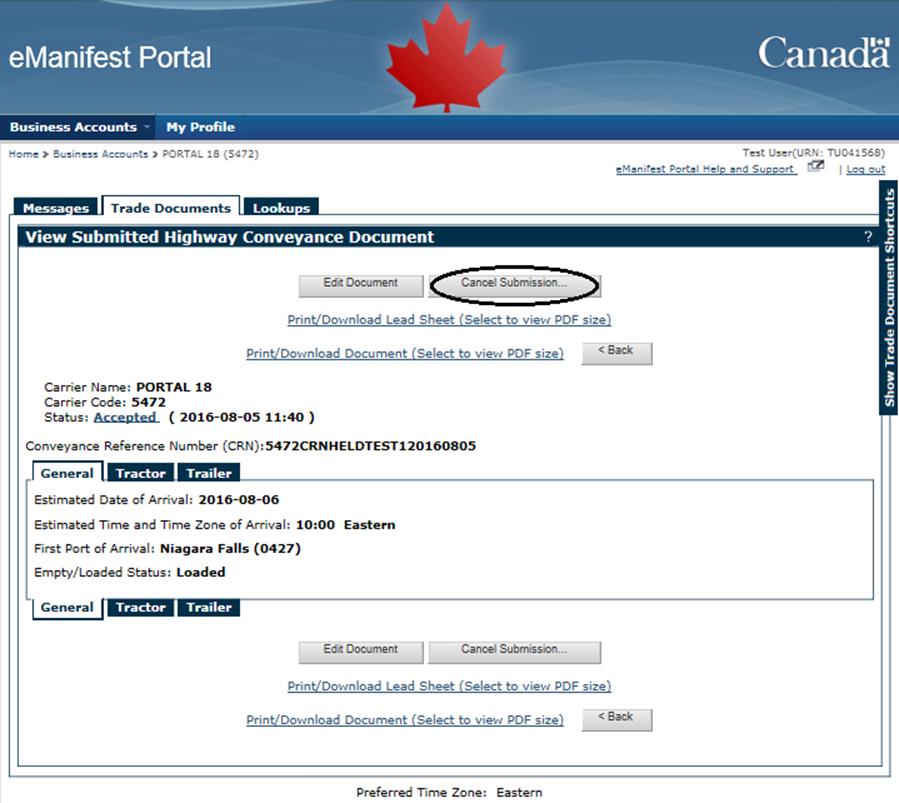
- Select Yes to confirm your action (see Figure 6-35).
Figure 6-35 Trade Documents tab - Cancel Submission

- A Request to Cancel Submission Sent message will be displayed confirming that the request to cancel the Highway Conveyance Document was sent to the CBSA.
- Select OK.
6.8 Printing/Downloading
The Print/Download option is available throughout the Trade Documents tab. It allows the user to print or download (save) Trade Documents or Lead Sheets in PDF format.
Users are encouraged to place a copy of downloaded Trade Documents on their own computer for record-keeping purposes.
6.8.1 Printing/Downloading a Trade Document
This section outlines how to open and print or download (save) a submitted Trade Document.
Start at: Trade Documents tab.
- Select the Draft Documents tab or the Submitted Documents tab to find the Trade Document you want to Print/Download.
- Select the Trade Document you want to Print/Download (see Figure 6-36).
Figure 6-36 Trade Documents tab - Submitted Documents tab

- Select Print/Download Document (see Figure 6-37).
Figure 6-37 Trade Documents tab - Submitted Highway Conveyance Document

- Select Open if you want to print the Submitted Highway Conveyance Document (see Figure 6-38). Proceed to step 6 if you want to Save the document.
Figure 6-38 File Download

File Download (see Figure 6-38)
- Open: Opens a PDF document and allows the user to print or save the document.
- Save: Allows the user to save a copy of the document.
- Cancel: Cancels the Print/Download request.
- The Highway Conveyance Document will open in a PDF file format and will be available to print (see Figures 6-39, 6-40 6-41).
Figure 6-39 Highway Conveyance Document - Page 1

Figure 6-40 Highway Conveyance Document - Page 2
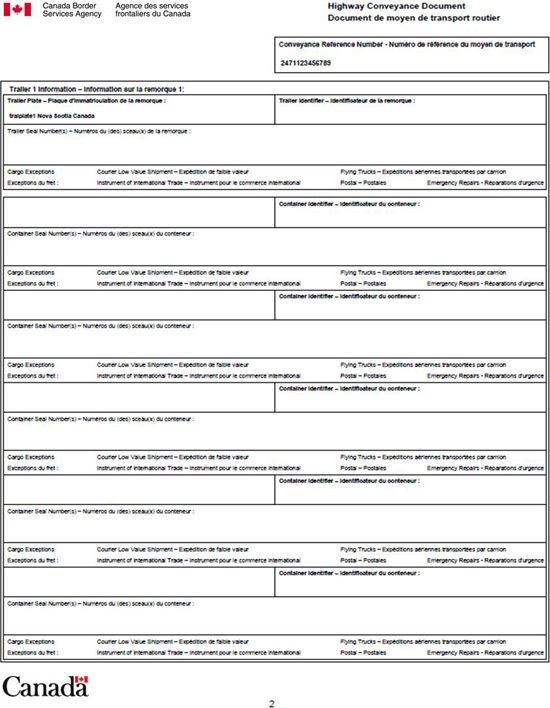
Figure 6-41 Highway Conveyance Document - Page 3

- To download (save) the Highway Conveyance Document on your computer, select Save.
6.8.2 Printing/Downloading a Lead Sheet
To print a Lead Sheet, follow steps 1 through 4 in section 6.8.1 of this Guide and select Print/Download Lead Sheet instead of Print/Download Document (see Figure 6-37).
The Portal-generated Lead Sheet includes a machine-readable bar code of the Conveyance Reference Number (CRN) as well as a list of all associated Cargo Control Numbers (CCN) (see Figure 6-42).
The lead sheet is a document with a machine-readable bar code which the carrier will be required to present at the First Port of Arrival (FPOA). The information provided on this document assists the CBSA in retrieving the advance commercial information you have submitted through the Portal. The lead sheet should contain either a bar-coded CRN, a bar-coded CCN with a handwritten CRN or a handwritten CRN if an alternate bar-coded document is also being presented with the lead sheet (e.g. PARS document with a bar-coded PARS number). The CBSA recommends you print the Portal generated Lead Sheet once your Highway Conveyance Document has reached Accepted Status.
If the carrier chooses to produce their own bar codes, see Memorandum D3-1-1, available on the CBSA Web site, for bar code specifications.
The option to generate a Lead Sheet is only available after a Highway Conveyance or Combined Highway Document is submitted to the CBSA.
This option is available on the following pages in the Portal:
- The confirmation message page when a Highway Conveyance or Combined Highway Document is initially submitted to the CBSA (see Figure 6-7).
- The confirmation page when a Highway Conveyance Document is resubmitted to the CBSA, after a Change or Amendment is made to the original Trade Document (see Figure 6-33).
- On the General tab of a Submitted Conveyance Trade Document (see Figure 6-37).
Figure 6-42 eManifest Portal Lead Sheet

6.9 Secondary Notices
This section outlines the information in regards to Secondary Notices (Manifest Forwards and Document Not on File notices).
- It is the user's responsibility to manage the Secondary Notices in their Business Account.
6.9.1 What are Secondary Notices?
Secondary Notices are Trade Document related notices that are forwarded to your attention on behalf of another Trade Chain Partner (Manifest Forward) or the CBSA (Document Not on File notices).
- Manifest Forward is an electronic copy of a House bill submitted to the CBSA, by a freight forwarder, which has been sent to your client identifier (carrier code).
- Document Not on File notice indicates that a Cargo Control Number containing your carrier code was quoted on a submitted Trade Document. This could be a Release or a House bill Close Message, but note that Document Not on File would not relate to a Conveyance quoting a CCN that is not on file.
6.9.2 Navigating the Secondary Notices Tab
This section contains figures and tables that provide an overview of the Secondary Notices tab, navigation features, the data that can be accessed and the available functions (see Figure 6-43).
Figure 6-43 Secondary Notices Tab

| 1 | Search Secondary Notices | Allows you to search for a specific Secondary Notice. See Section 6.9.3 of this Guide for detailed procedures. |
Filtering Secondary Notices allows you to specify criteria which will narrow the type of Secondary Notices displayed in the list. The following table summarizes the filter options, the column headings for the different lists and the available functions.
| Filter Secondary Notices (see Figure 6-43) | ||
|---|---|---|
| Filter Options | Description | |
| 2 | All Secondary Notices | All Secondary Notice types will be displayed. |
| Manifest Forwards | Only Manifest Forwards will be displayed. | |
| Document Not on File Notices | Only Document Not on File notices will be displayed. | |
| 3 | All Document Types | Secondary Notices for all Document Types will be displayed. |
| House bills | Only Secondary Notices for House bills will be displayed. | |
| 4 | Refresh | Selecting Refresh generates and produces the requested filtered documents list. |
| Secondary Notices List (see Figure 6 43) | ||
|---|---|---|
| Column Headings | Description | |
| 5 | Document Number | Selecting the Document Number from the list will open the Manifest Forwarded Trade Document (see Figure 6-43, item 10). |
| 6 | Document Type | The Document Type of the Secondary Notice. Note: A “-“ is displayed if the Document Type is not known. |
| 7 | Notice Date/Time | The date and time the Secondary Notice was created. |
| 8 | Status | Selecting the Status from the list will open the Document Not on File notice (see Figure 6-43, item 11). |
| 9 | Action | Allows you to delete the Secondary Notice from the Secondary Notices list (see Section 6.9.5). |
| 10 | Manifest Forward link | Allows you to view the details of the Manifest Forwarded document (see Figure 6-45) |
| 11 | Status link | Allows you to view the details of the Document Not on File notice (see Figure 6-46) |
| 12 | Customize List/Tab | Allows you to customize the look of the page. See section 6.9.4 in this Guide for detailed procedures. |
6.9.3 Searching Secondary Notices
This section outlines the different ways to search for a Secondary Notice.
The Search Secondary Notices function allows you to search for a specific Secondary Notice that has been sent to you. The Document number (CCN) is required and only exact matches of the number will be displayed.
The full Document Number must be entered. If you enter only a partial Document Number, you will receive an error message. Only exact matches will be displayed.
The Search Secondary Notices function only searches the Secondary Notices which are found in your Secondary Notices List. Deleted Secondary Notice(s) are permanently removed from the Secondary Notices list and are not included in the Search Secondary Notices function.
Start at: Trade Documents tab.
- Select Secondary Notices tab.
- Select Search Secondary Notices (see Figure 6 43 – item 1).
- Enter the Document Number (CCN) of the Secondary Notice you want to find (see Figure 6 44).
- Select Search (see Figure 6 44).
Figure 6-44 Search Secondary Notices
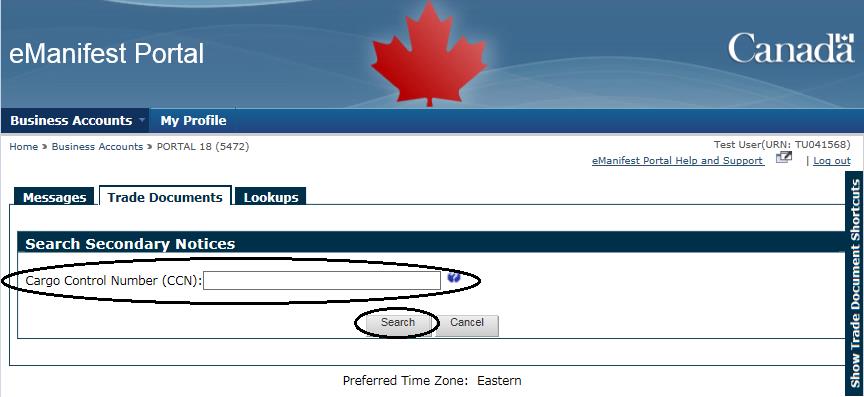
- The matching Secondary Notice will be displayed, either a Manifest Forward (see Figure 6-45) or a Document Not on File notice (see Figure 6-46).
Figure 6-45 Search Secondary Notices Search Results – Manifest Forward
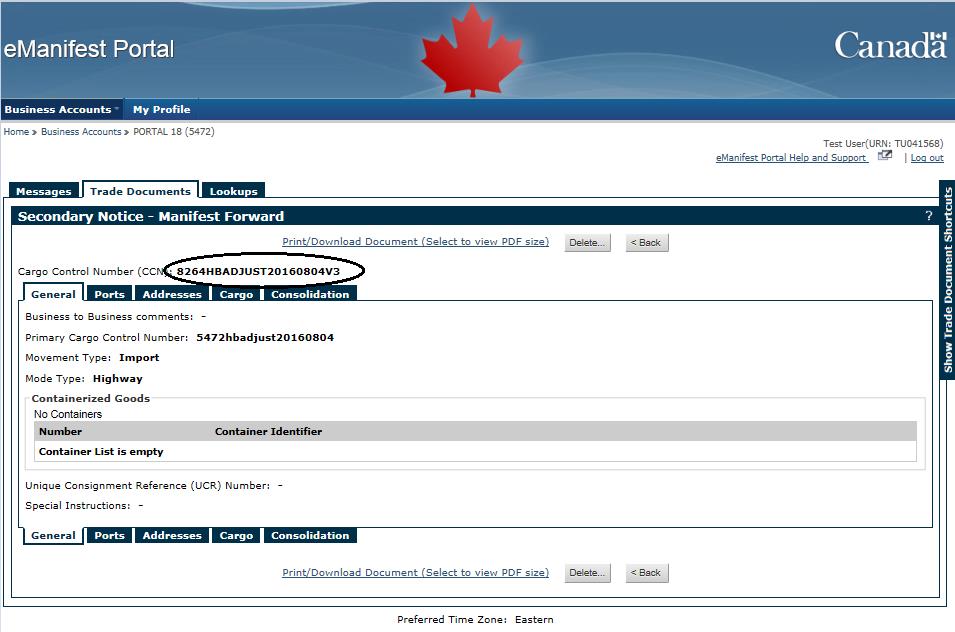
Figure 6-46 Search Secondary Notices Search Results – Document Not on File notice
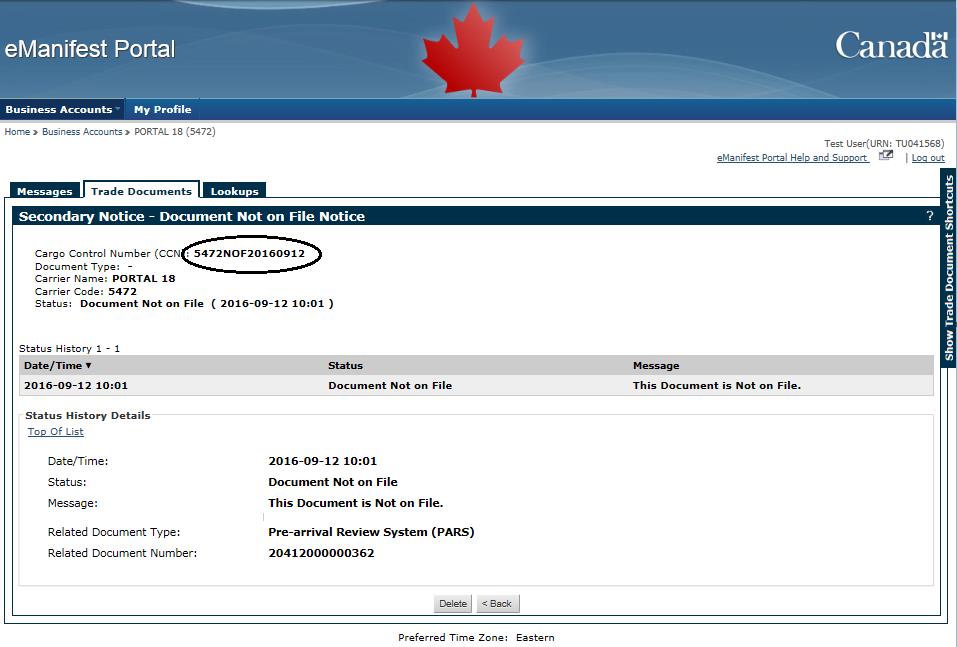
If no matching Secondary Notice is found, you can either change your search criteria or cancel the search.
6.9.4 Customizing the Secondary Notices List/Tab
You can change the number of documents displayed on the Secondary Notices list with the Customize Secondary Notices List function.
By default, 10 documents are displayed on each Secondary Notices page.
Start at:Trade Documents tab.
- Select the Secondary Notices sub-tab and then Customize List/Tab (see Figure 6 47).
Figure 6-47 Secondary Notices Tab
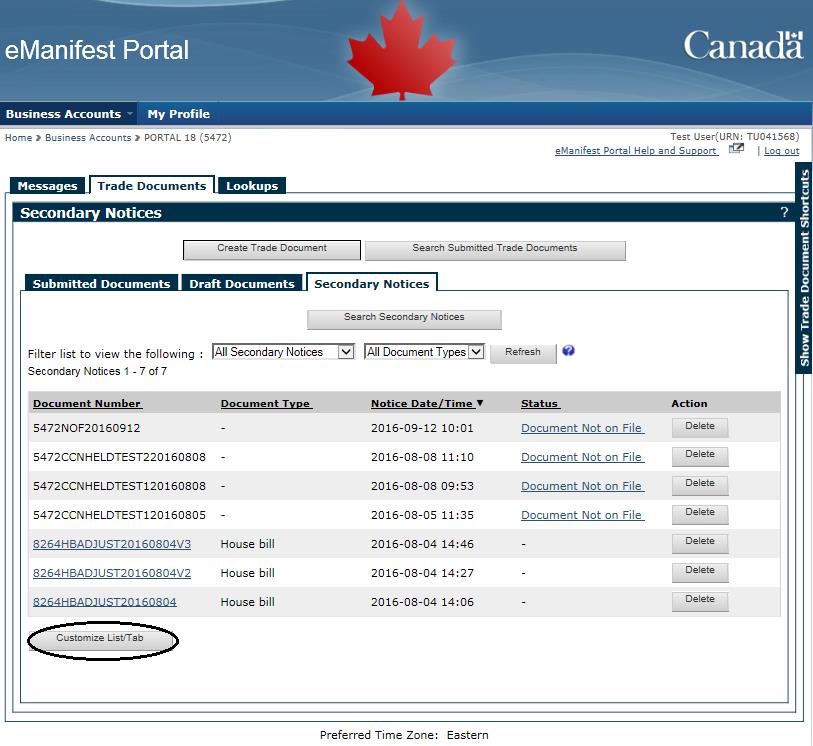
2. Under Customize Secondary Notices List, select the number (10, 25 or 50) of documents you want to be displayed (see Figure 6 48).
Figure 6-48 Customize Secondary Notices

3. Select Save (see Figure 6 48).
4. Select OK to save your customized settings.
You can customize the Trade Document sub-tab default in the Trade Documents tab with the Customize Trade Document Tab function.
By default, the Submitted Documents sub-tab will appear when selecting the Trade Documents tab.
Start at: Trade Documents tab.
- Select the Secondary Notices sub-tab and then Customize List/Tab (see Figure 6-43).
- Under Customize Trade Document section, select the default sub-tab between: Submitted Documents, Draft Documents and Secondary Notices (see Figure 6-48).
- Select Save (see Figure 6-48).
- Select OK to save your customized settings.
You can customize the Submitted Documents list filtering default in the Trade Documents tab with the Customize Trade Document Tab function.
Start at: Trade Documents tab.
- From the Secondary Notices sub-tab, select Customize List/Tab (see Figure 6-43).
- Under Customize Trade Document section, select your default Submitted Documents List filtering preferences by selecting the:
- Status;
- Status (Current or Historical); and,
- Trade Document type (Cargo document or Conveyance document) (see Figure 6-48).
- Select Save (see Figure 6-48).
- Select OK to save your customized settings.
6.9.5 Deleting a Secondary Notice
This section outlines how to delete a Secondary Notice.
The following example provides instructions for deleting a Manifest Forward (Secondary Notice).
Start at: Trade Documents tab.
- Select the Secondary Notice sub-tab (see Figure 6-49).
Figure 6-49 Trade Document tab - Secondary Notices

- Under the Action column, select Delete aligned to the Document Number of the Manifest Forward you want to delete (see Figure 6-49).
- Select Yes to confirm your action (see Figure 6-50).
Figure 6-50 Trade Document tab - Delete Secondary Notices

- Select OK to delete your Secondary Notice.
7.0 Lookups
This section outlines how to create, search for and delete a Lookup.
A Lookup is a Portal feature designed to save time by allowing both highway carrier and freight forwarder Account Users to create and store frequently used information: Tractor, Trailer, Shipper, Consignee, Notify Party, Delivery Address and Trade Documents for highway carriers and Shipper, Consignee, Notify Party, Delivery Address, Consolidator, SNP ID and Trade Documents for freight forwarders. A Lookup can be created when you are working in a Trade Document, or within the Lookup tab.
For example, if you do business with the same Shipper on a regular basis, you can create a Lookup and recall their information (name, address, postal code, phone number, etc.) to avoid re-keying this information in future Trade Documents.7.1 Types of Lookups
The Lookups tab contains five sub-tabs. Each sub-tab allows the Account User to create a new Lookup, search for an existing Lookup and/or display a list of previously created Lookups.
The Search Lookups option will not be available if Lookups have not been created.
All users within a Business Account can create, view and use Lookups created by any Account User within the Business Account.
Each Business Account is limited to a maximum of 1,000 Lookups per type (i.e. Tractor, Trailer, Shipper, Consignee and Notify Party).
The following table outlines the mandatory fields within each of the five different Lookup types.
| Mandatory Fields | Highway Carrier Lookup Types | ||||||
|---|---|---|---|---|---|---|---|
| Tractor | Trailer | Shipper | Consignee | Notify Party | Delivery Address | Trade Document | |
| Name | Available | Available | Available | Available | Available | Available | Available |
| Identifier | Available | Available | |||||
| Plate Number | Available | Available | |||||
| Province/State | Available | Available | |||||
| Country | Available | Available | Available | Available | Available | Available | |
| City | Available | Available | Available | Available | |||
| Street Address | Available | Available | Available | Available | |||
| Province/State and Postal/Zip Code (If Canada or USA) | Available | Available | Available | Available | |||
| Mandatory Fields | Freight Forwarder Lookup Types | ||||||
|---|---|---|---|---|---|---|---|
| Shipper | Consignee | Notify Party | Delivery Address | Consolidator | SNP | Trade Document | |
| Name | Available | Available | Available | Available | Available | Available | Available |
| Street Address | Available | Available | Available | Available | Available | ||
| City | Available | Available | Available | Available | Available | ||
| Country | Available | Available | Available | Available | Available | ||
| Province/State and Postal/Zip Code (If Canada or USA) | Available | Available | Available | Available | Available | ||
| Business Type | Available | ||||||
| Client Identifier | Available | ||||||
All fields within each tab are mandatory unless otherwise indicated.
Figure 7-1 Lookups tab
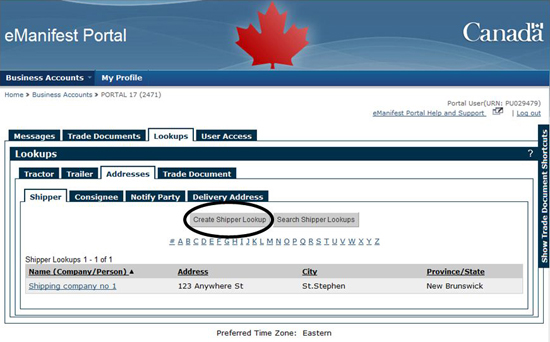
The Search Lookups option will only be available if Lookups have been created. If there are no Lookups, only the Create Lookup option will be available.
7.2 Creating a Lookup
This section outlines how to create a Lookup.
A Lookup can be created within the Lookups tab (see Figure 7-1), or when working in a Trade Document (see Figure 6-2, item 6).
7.2.1 Creating a Lookup from within the Lookups tab
Account Users can create Lookups for a Business Account before creating a Trade Document.
The following example provides instructions for creating a Trailer Lookup. The same process would be used to create any other Lookup (Tractor, Shipper, Consignee, Notify Party, Delivery address, Consolidator, SNP or Trade Document) within the Lookups tab.
Start at: Lookups tab.
- Select the Trailer tab.
- Select Create Trailer Lookup (see Figure 7-2).
Figure 7-2 Lookups tab - Trailer tab (Create Trailer Lookup)

- Enter all mandatory information in the Lookup fields (see Figure 7-3).
- Select Create (see Figure 7-3).
Figure 7-3 Lookups tab - Create Trailer Lookup
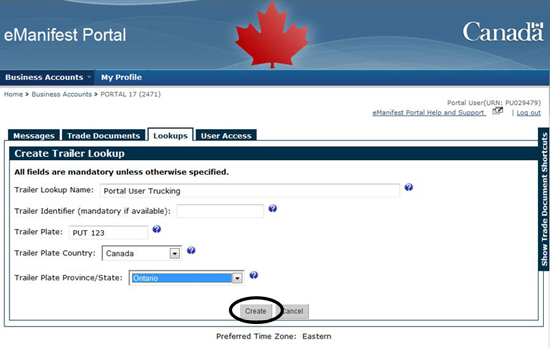
- A Trailer Lookup Created message will be displayed confirming that the Lookup has been created.
- Select OK .
If the Lookup name that you entered already exists, a Lookup Name Already Exists message will be displayed.
- Select Yes to confirm that you want to use the same name.
- Trailer Lookup Created message will be displayed.
- Select OK.
Once 1,000 Lookups have been created for this Lookup type, a Maximum Lookup Limit Reached message will be displayed. You must delete an existing Trailer Lookup before creating another.
- Select OK.
- Delete the Lookup that you no longer use.
- Create a new Lookup.
7.2.2 Creating a Lookup when working in a Trade Document
Creating a Lookup while working in a Trade Document follows the same steps as creating a Lookup within the Lookups tab. See section 6.3 of this Guide for details on creating Trade Documents.
The following example provides instructions for creating a Shipper Lookup. The same process would be used to create any other Lookup type except a Trade Document Lookup, see section 7.3.3 for instructions on creating a Trade Document Lookup when in a Trade Document.
Start at: Trade Documents tab.
- Select Create Trade Document.
- Select Highway Cargo Document.
- Select Submit.
- Enter the Trade Document information.
- Select Addresses tab.
- Enter data in all mandatory fields in the Shipper section.
- Select Create a Shipper Lookup (See Figure 7-4).
- A Shipper Lookup Created message will be displayed confirming that the Lookup has been created.
- Select OK.
Figure 7-4 Trade Documents tab - Addresses tab (Shipper section, Create a Shipper Lookup)

- The Shipper Lookup is created and you can continue creating your Trade Document.
If the Lookup name that you entered already exists, a Lookup Name Already Exists message will be displayed.
- Select Yes to confirm that you want to use the same name.
- Shipper Lookup Created message will be displayed.
- Select OK.
- Select No to stop the Lookup name from being duplicated.
Once 1,000 Lookups have been created for the Lookup type, a Maximum Lookup Limit Reached message will be displayed.
- Select OK.
- The Shipper Lookup list will be displayed with the following message: This Business Account has reached the limit of 1,000 Trailer Lookups. You must delete an existing Shipper Lookup before creating another.
7.2.3 Creating a Trade Document Lookup when submitting a Trade Document
You are able to create a Trade Document Lookup when submitting a Trade Document. You would use this function when you frequently send similar Trade Documents with the same information.
Start at: Trade Documents tab.
- Select Create Trade Document.
- Select Trade Document of choice.
- Select Submit.
- Enter the required information for your trade document submission (see section 6.3.1).
- Select Submit to the CBSA.
- Verify the information submitted is correct, select Yes if correct or No if any changes are required.
- Select Use submitted Highway Document information to create Trade Document Lookup (see Figure 7-5).
Figure 7-5 Trade Documents tab - Create a Lookup from a submitted Trade Document
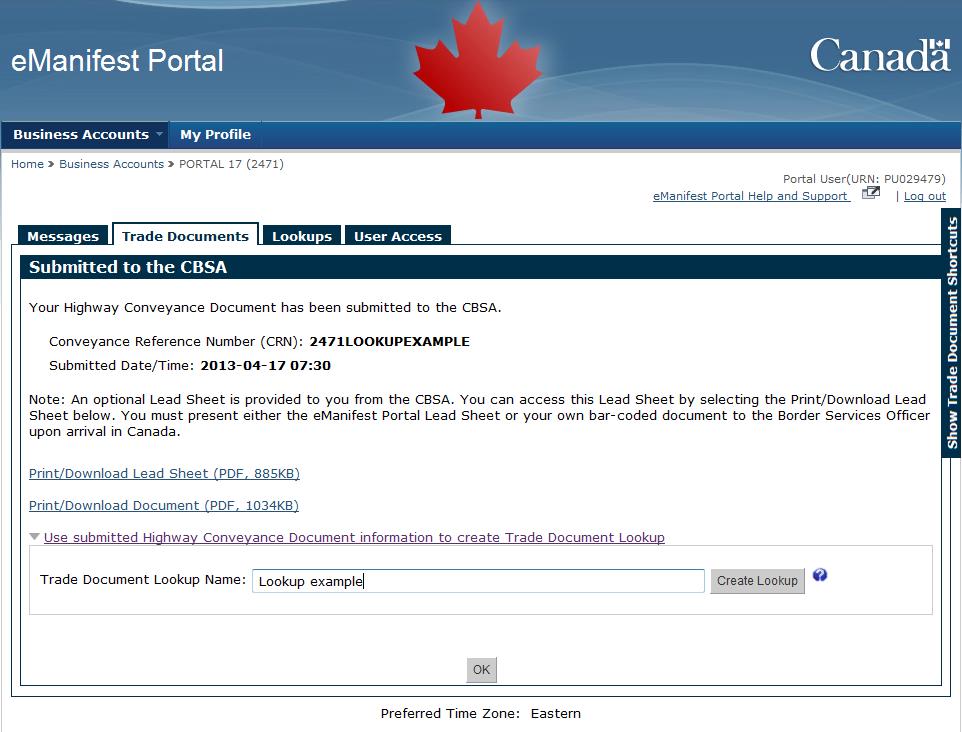
- Enter a Lookup name.
- Select Create Lookup (see figure 7-5).
- A confirmation message will appear to let you know that a new Lookup has been created.
- Select OK.
7.3 Searching for and using a Lookup
This section outlines how to search for and use Lookups.
Searching for a Lookup is useful in the following instances:
- using a Lookup in a Trade Document;
- updating the details of a Lookup; and/or
- deleting a Lookup.
You can search for a Lookup in the Lookups tab (see Figure 7-1), or when creating a Trade Document (see Figure 6-2, item 5).
7.3.1 Searching for Lookups Criteria
The following table outlines the information fields that can be used to search all the different Lookup types. For example, if you are looking for a Shipper Lookup, you can filter and sort the existing list by: Name, City, or Province/State.
The Lookup search criteria do not have to be an exact spelling to the saved Lookup name. For example, searching with letter "S" will return all Lookups starting with the letter "S"
| Fields | Highway Carrier Lookup Types | |||||
|---|---|---|---|---|---|---|
| Tractor | Trailer | Shipper | Consignee | Notify Party | Delivery Address | |
| Name | Available | Available | Available | Available | Available | Available |
| Identifier | Available | Available | ||||
| Plate Number | Available | Available | ||||
| Province/State | Available | Available | Available | Available | Available | Available |
| City | Available | Available | Available | Available | ||
| Mandatory Fields | Freight Forwarder Lookup Types | |||||
|---|---|---|---|---|---|---|
| Shipper | Consignee | Notify Party | Delivery Address | Consolidator | SNP | |
| Name | Available | Available | Available | Available | Available | Available |
| Province/State | Available | Available | Available | Available | Available | |
| City | Available | Available | Available | Available | Available | |
| Number of SNP ID's | Available | |||||
7.3.2 From the Lookups tab
The following example provides instructions on searching for a Consignee Lookup. The process is the same to search any other Lookup (Tractor, Trailer, Shipper, Notify Party, Delivery Address, Consolidator and SNP).
Start at: Lookups tab.
- Select the Addresses tab.
- Select the Consignee sub-tab.
- Select the Search Consignee Lookups field, enter the name of the Consignee you want to find under "Search for:" (see Figure 7-6).
- Select Search (see Figure 7-6).
Figure 7-6 Lookups tab - Search Consignee Lookups
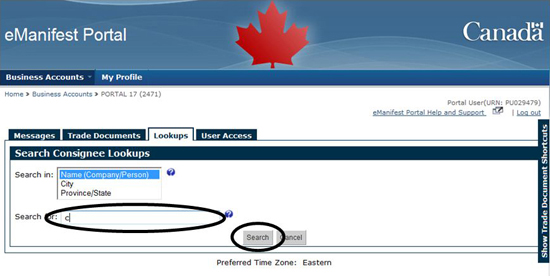
- The results of the search Consignee Lookups will be displayed.
- Select the appropriate Consignee Lookup from the available list (see Figure 7-7). Should no similar company exist, you will be brought directly to the Consignee Lookup Details page.
Figure 7-7 Lookups tab - Consignee Lookup Search Results

Selecting any of the underlined column headings will sort the list using the information in that column.
The alpha/numeric characters available can be used to display any/all Lookup Names starting with the selected letter or number.
7.3.3 Using a Lookup While Working in a Trade Document
The following example provides instructions for using the Shipper Lookup while creating a Combined Highway Document. The process is the same for using any other Lookup (Tractor, Trailer, Consignee, Notify Party, Delivery Address, Consolidator and SNP) in any of the following Trade Document types: Conveyance, Cargo, Combined or House bill.
Start at: Trade Documents tab.
- Select Create Trade Document.
- Select Combined Highway Document.
- Select the Addresses tab.
- Select a Select a Shipper Lookup in the Shipper section to find a Lookup to use within this Trade Document (see Figure 7-8).
Figure 7-8 Trade Documents tab - Create Combined Highway Document (Select Shipper Lookup)

- The Select a Shipper Lookup page will be displayed.
- Select the appropriate Lookup from the available list or use the Search Shipper Lookups option (see Figure 7-9).
Figure 7-9 Trade Documents tab - Shipper Lookup Search Results

- The information from the selected Lookup will be displayed in the Shipper fields (see Figure 7-10).
Figure 7-10 Trade Documents tab - Shipper Information Populated by Selected Lookup

7.3.4 Using a Trade Document Lookup to create a Trade Document
The following example provides instructions for using the Trade Document Lookup to create a Combined Highway Document.
Start at: Trade Documents tab.
- Select Create Trade Document.
- Select Use Trade Document Lookup.
- Select Submit (see Figure 7-11).
Figure 7-11 Use Trade Documents Lookup
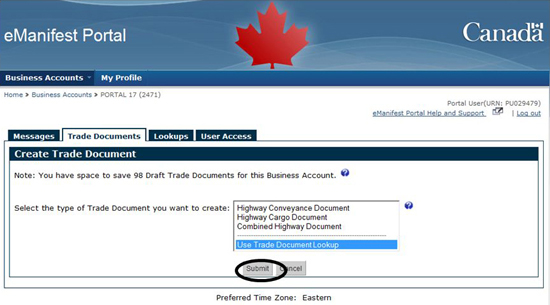
- Select the Trade Document Lookup you would like to use and select Select (See Figure 7-12).
Figure 7-12 Select Trade Documents Lookup

- Enter the CRN, CCN, Estimated Date of Arrival and Estimated Time and Time Zone of Arrival and any other missing mandatory elements (See Figure 7-13).
- Select each of the tabs to verify that the information is complete and valid. Make any changes needed (See Figure 7-13).
- Select Submit to the CBSA (See Figure 7-13).
Figure 7-13 Use Trade Documents Lookup
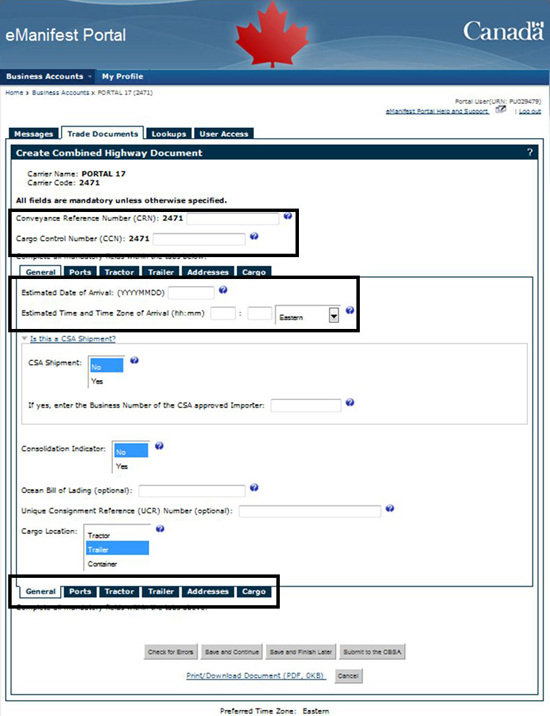
7.4 Editing a Lookup
This section outlines how to edit a previously created Lookup. To find a previously created Lookup, refer to section 7.3 in this Guide.
The following example provides instructions for editing the Tractor Lookup. The process is the same for any other Lookup (Trailer, Shipper, Consignee and Notify Party, Delivery Address, SNP or Trade Document).
Start at: Lookups tab.
- Select Tractor tab.
- Select the Lookup you want to edit (see Figure 7-14).
Figure 7-14 Lookups tab - Tractor sub-tab

- The Tractor Lookup Details page will be displayed.
- Select Edit (see Figure 7-15).
Figure 7-15 Lookups tab - Tractor Lookup Details
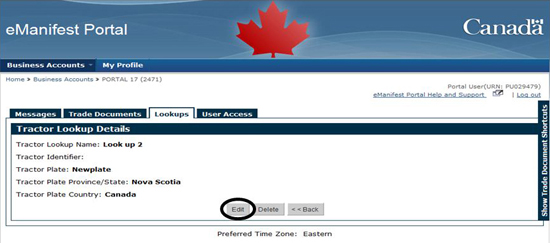
- Edit Tractor Lookup information and select Submit (see Figure 7-16).
Information edited within the Lookup will not be saved if the Cancel option is selected.
Figure 7-16 Lookups tab - Edit Tractor Lookup

- A Tractor Lookup Updated message will be displayed confirming that the Lookup has been updated.
- Select OK.
7.5 Deleting a Lookup
This section provides instructions for deleting a previously created Lookup. To find a previously saved Lookup, refer to section 7.4 in this Guide.
The following example provides instructions for deleting a Tractor Lookup. The process is the same for any other Lookup (Trailer, Shipper, Consignee, Delivery Address, Notify Party, Consolidator, SNP and Trade Documents).
Start at: Lookups tab.
- Select Tractor tab.
- Select the Lookup you want to delete (see Figure 7-14).
- The Tractor Lookup Details page will be displayed.
- Select Delete (see Figure 7-17).
Figure 7-17 Lookups tab - Tractor Lookup Details
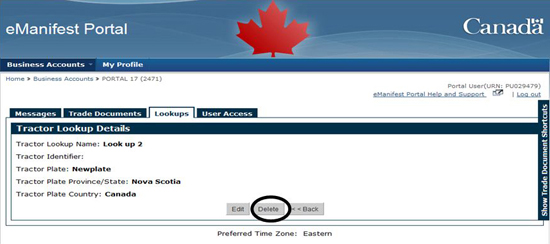
- A Delete Tractor Lookup message will be displayed prompting you to confirm that you want to delete the Lookup.
- Select Yes to continue or No to cancel deleting the Lookup (see Figure 7-18).
Figure 7-18 Lookups tab - Delete Tractor Lookup
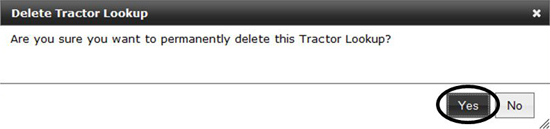
8.0 Updating Profile Information
This section outlines how to update the Account User and Account Owner information.
Whenever there is a change to your personal information (i.e. name, telephone number, e-mail address, etc.), you are required to make these changes in your My Profile.
You are responsible for keeping your Profile information up to date.
8.1 Updating User Account Profile Information
This section outlines the steps for updating your profile information.
Start at: eManifest Portal.
- Select My Profile in the top menu bar (see Figure 8-1).
Figure 8-1 Updating Profile Information
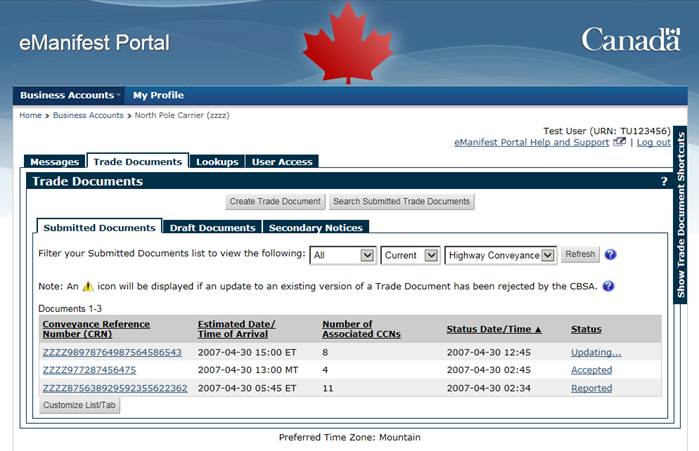
- The My Profile page will be displayed.
- Select Edit (see Figure 8-2).
Figure 8-2 My Profile - Edit

- Edit the information as needed.
- Select Save to save the changes or Cancel saving the changes (see Figure 8-3).
Figure 8-3 Edit My Profile - Edit Profile Information
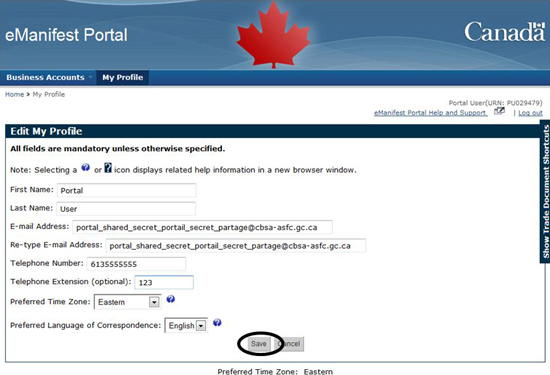
- My Profile Updated message will be displayed confirming that your profile has been updated.
- Select OK.
Updated profile information is displayed on My Profile page.
8.2 Deleting a User Account
This section outlines the steps to delete your User Account.
Start at: eManifest Portal.
- Select My Profile in the top menu bar (see Figure 8-1).
- The My Profile page will be displayed (see Figure 8-2).
- Select Delete User Account.
- A User Account Deletion confirmation message will appear, select Yes (see Figure 8-4).
Figure 8-4 Edit My Profile - Delete User Account

- A User Account Deleted page will be displayed confirming that your User Account has been deleted.
- An e-mail will be sent to the user's e-mail address to confirm the User Account deletion.
- Select OK and your eManifest Portal session will end.
9.0 Managing User Accounts
This section outlines how to edit the role of an Account User, and the steps to suspend or remove Account Users associated with your Business Account.
Only Account Owners or Proxy Account Owners will be able to perform these administrative functions.
9.1 Editing an Account User Role
This section outlines the steps to edit the role of an Account User associated with your Business Account. To modify the Account Owner of a Business Account, the Business Contact will need to contact the Technical Commercial Client Unit (TCCU) by telephone, see the eManifest Portal - Frequently Asked Questions (FAQs) addressed to your company type. For more information on user roles, see section 2.5.4 of this Guide.
Start at: eManifest Portal.
- Select User Access tab (see Figure 9-1).
- A list of all Account Users will be displayed, including their assigned user role and user status. The list of Account Users is sorted alphabetically by default.
- If the Account User you are looking for is not displayed, select the first letter of the Account User's family name to see a list of all Account Users whose family name begins with the same letter.
- Select the User (see Figure 9-1).
Figure 9-1 User Access tab - User Access (Account Users)

- Select Edit (see Figure 9-2).
Figure 9-2 User Access tab - User Details (Edit)
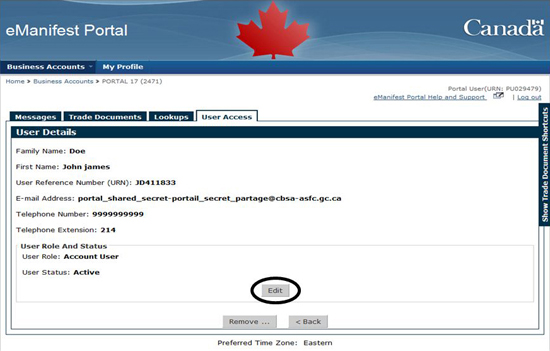
- Edit the Account User Role and/or the User Status (see Figure 9-3).
- Select Submit (see Figure 9-3).
Figure 9-3 User Access tab - Edit User Role
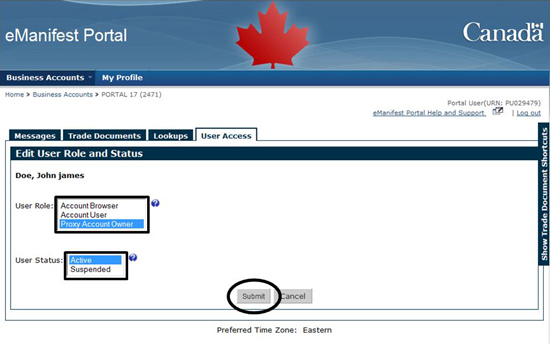
- A User Profile Updated message will be displayed confirming the User Role and Status has been updated.
- Select OK.
9.2 Suspending an Account User
This section outlines the steps to Suspend an Account User associated with your Business Account.
Start at: eManifest Portal.
- Select User Access tab.
- Select the User (see Figure 9-1).
- Select Edit (see Figure 9-4).
Figure 9-4 User Access tab - User Details (Modify)
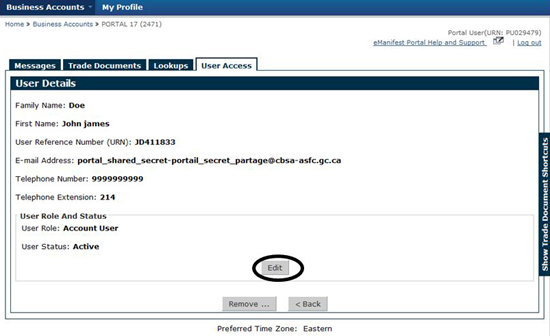
- Select Suspended as the User Status (see Figure 9-5).
Figure 9-5 User Access tab - Edit User Role and Status (Suspend)

- Select Submit (see Figure 9-5).
- A User Profile Updated message will be displayed confirming the User Role and Status has been updated.
- Select OK.
- The Account User role will be displayed as suspended (see Figure 9-6).
Figure 9-6 User Access tab - Suspend User (User Role Suspended)

9.3 Removing an Account User
This section outlines the steps to remove an Account User associated with your Business Account.
Once an Account User has been removed from a Business Account, they will no longer have access to the Business Account and their association with that Business Account will be severed. The Account User's own Portal profile will remain unchanged and the user will still have access to other authorized business accounts.
Start at: eManifest Portal.
- Select User Access tab.
- Select the User (see Figure 9-1).
- Select Remove (see Figure 9-7).
Figure 9-7 User Access tab - User Details (Remove)

- A Remove User message will be displayed prompting you to confirm that you want to remove the user (see Figure 9-8).
- Select Yes to remove the Account User or No to cancel removing the Account User (see Figure 9-8).
Figure 9-8 User Access tab - User Details (Remove User)
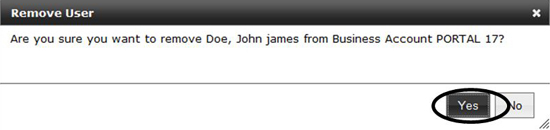
- The User Account is successfully removed and will no longer be displayed in the User Access list (see Figure 9-9).
Figure 9-9 User Access tab - User Access (Account User Removed)

10.0 Managing Business Accounts
This section outlines how to edit the Account Owner or Business Account Information and how to delete the Business Account.
Only Account Owners will be able to perform these administrative functions.
10.1 Updating Business Account Information
This section outlines how to update the Account Owner and Business Account information. All updates made to the Business Account information will be sent to the CBSA to be verified before the information is updated in the Portal. You will receive an e-mail when the updates have been processed by the CBSA.
10.1.1 Edit the Account Owner Information
Start at: eManifest Portal.
- Select Business Accounts in the top menu bar.
- Select Modify from the Action column next to the Business Account you want to update (see Figure 10-1).
Figure 10-1 Business Accounts - Updating Business Account Information

- The Modify Business Account page will be displayed which will default to the Account Owner Information page.
- Select Modify (see Figure 10-2).
Figure 10-2 Business Accounts - Account Owner Information tab
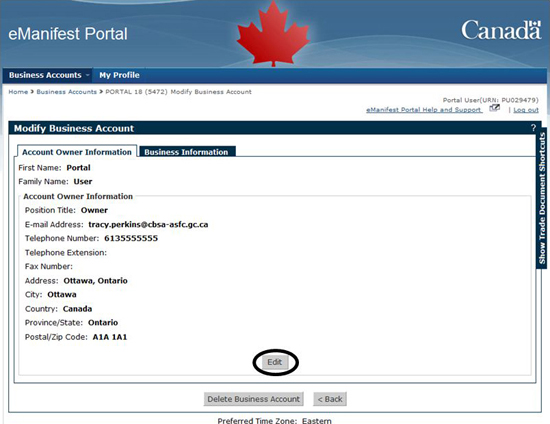
Figure 10-3 Business Accounts - Editing Account Owner Information
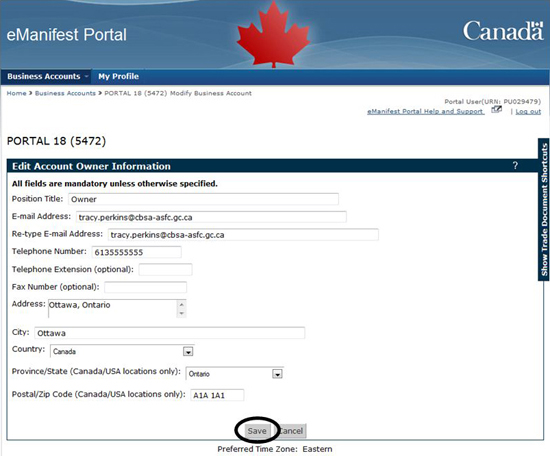
- Update the required information and select Save (see Figure 10-3).
- A confirmation message will appear, select OK.
10.1.2 Edit the Business Account Information
Start at: eManifest Portal.
- Select Business Accounts in the top menu bar.
- Select Modify from the Action column next to the Business Account you want to update (see Figure 10-1).
- The Modify Business Account page will be displayed.
- Select the Business Information tab (see Figure 10-4).
Figure 10-4 Business Accounts - Request Business Account Update
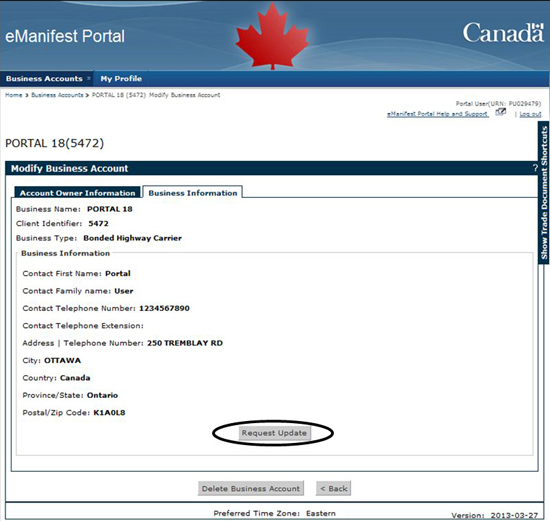
- Select Request Update.
- Update the required information and select Submit (see Figure 10-5).
Figure 10-5 Business Accounts - Request Business Account Update

- A confirmation message will appear, select OK.
The Business Information Updates Submitted screen indicates that you will receive an e-mail once your request has been processed.
10.2 Setting a Default Business Account
This section outlines the steps for setting one Business Account as the default in cases when you are managing several Business Accounts.
Start at: eManifest Portal.
- Select Business Accounts (see Figure 10-6).
Figure 10-6 Business Accounts - Default log in Business Account
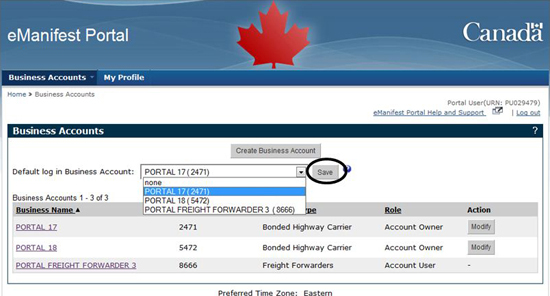
- Select the default Business Account from the drop-down list and select Save (see Figure 10-6).
- A Default Log In Preference Updated message will be displayed confirming the default Business Account has been updated.
- Select OK.
10.3 Deleting a Business Account
This section outlines the steps to delete your Business Account.
Start at: eManifest Portal.
- Select Modify under the Action column next to the Business Account you want to delete (see Figure 10-7).
Figure 10-7 Business Accounts - Modifying a business account
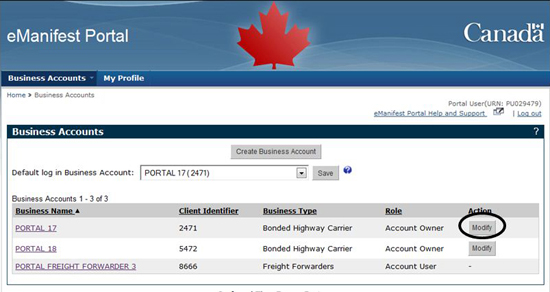
- The Modify Business Account page will be displayed.
- Select Delete Business Account. (see Figure 10-8)
Figure 10-8 Business Accounts - Deleting a business account

- A Business Account Deletion confirmation message will appear, select Yes (see Figure 10-9).
Figure 10-9 Business Accounts - Delete Business Account confirmation message
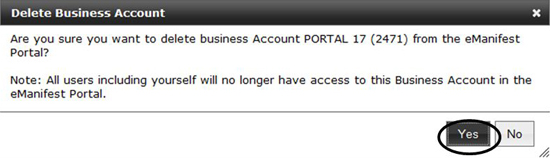
- A Business Account Deleted page will be displayed confirming that your Business Account has been deleted.
- Select OK.
- An e-mail will be sent to the Account Owner e-mail address provided to confirm the Business Account deletion.
- Date modified: